Arwen's meanderings

Hi everyone and welcome to my dinghy cruising blog about my John Welsford designed 'navigator' named Arwen. Built over three years, Arwen was launched in August 2007. She is a standing lug yawl 14' 6" in length. This blog records our dinghy cruising voyages together around the coastal waters of SW England.
Arwen has an associated YouTube channel so visit www.YouTube.com/c/plymouthwelshboy to find our most recent cruises and click subscribe.
On this blog you will find posts about dinghy cruising locations, accounts of our voyages, maintenance tips and 'How to's' ranging from rigging standing lug sails and building galley boxes to using 'anchor buddies' and creating 'pilotage notes'. I hope you find something that inspires you to get out on the water in your boat. Drop us a comment and happy sailing.
Steve and Arwen

Friday 31 December 2021

Making a right angled viewfinder for the Ioptron Skytracker Pro polarscope

 Nothing to do with boats this post; all about astrophotography. And some very welcome end of year ingenuity. Wished I'd had this through the year but better late than never I guess. 

I use an Ioptron Skywatcher Pro star tracker. It is the smallest of the star trackers and a clever little gizmo. It allows me to take far longer exposure photos at lower ISO of the night skies above me. It is also great for astrophotography landscape pictures under the Milky Way. 

My Ioptron Skytracker Pro with the polarscope in its slot on the right hand side

Two niggles I have with it are

  • its low payload - 2lbs 8ozs without additional counterweights - so I can just about use my DSLR with its 250mm lens on before I get star trailing
  • the polarscope arrangement - which has you on bended knees with a cricked back. 
There isn't an astrophotographer alive who uses a star tracker who doesn't understand this last issue. here at a latitude of 50N - the tilt of the tracker is such that when the polarscope is inserted, you are on your knees with your back arched to look up through it. If you can do that! When I'm on my knees below it, my eye is around 14" away from the viewfinder - rendering it useless!

Down at the beach using the skytracker for the first time
It is actually midnight with a full moon - a useless time to try and use a star tracker as all the milky way is washed out from moonshine. You live and learn! 😂

(I should at this point explain that a polarscope is essential to getting good alignment with the stars so that the camera tracks their movement above. This involves aligning the tracker with the north star Polaris. The bigger the lens you use, the more accurate you have to be in your alignment processes - otherwise you will have horrible trailing stars and photos that cannot be stacked together in any available software.)

Take one polarscope, one sky tracker and one right angle DSLR viewfinder.....

Anyway, cut a long story short. I was mulling over this conundrum a few days ago when sudden inspiration hit me - a solution to the issue.  Now, to be fair, I probably saw a similar idea sometime during the year on a forum or in a magazine and ignored it because at the time it didn't seem relevant to me. However, my brain must have filed the germ of an idea away somewhere and this is what surfaced today.

I managed to purchase off ebay a very old but functional right angle DSLR viewfinder for £20. Now a purpose designed right angle viewer for a polarscope retails at £69 plus! 


I removed the metal silver viewfinder frame off my ebay purchase by undoing the four tiny screws and then took the protective cover lid off the polarscope. Using the silver viewfinder slot as a template I then marked out drill holes and also a central large hole to be cut out.


Ten minutes judicious use of my multi-tool with drill and then sander bits and hey presto - the protective lid had been cut out. It was then just a matter of screwing the lid back onto the DSLR viewfinder and then doing a few trial fits. 


It proved to be a little loose but a thin strip of duct tape on half of the lid lip - turned it to a fairly snug push-on fit. 

Does it work?  OF COURSE IT DOES! 😁
I have genuinely surprised myself - no more wet knees, cricked neck or wrecked back muscles. 


Now if only the clouds would clear for a few hours around midnight!! 😭

And a few shots I have managed to take in the first six months of learning a new hobby.......enjoy 

A very first effort at M31 Andromeda galaxy

Second effort at M45 Pleaides 

First effort at the milky way - this is cropped in on the image - the galactic core 

First effort at M45

First effort at the Orion nebula 


Tuesday 28 December 2021

The smell of varnish

 There is something relaxing, calming, even settling, about varnishing a pair of oars. There is that smell which I find hard to describe but which always brings a little skip to the beat of my heart.

 I know there are many who despise varnish. Perhaps not despising the varnish finish itself, but more the hours of preparation that have to go into getting the base for a really good lustrous finish; followed by the many coats needed to enhance the natural colour of the wood to achieve that lovely rich sheen.  

There are some I know, who would advocate that the best form of varnish for a boat is a coat of white paint! They will remain nameless, although I am sure, they are referring to hull work only; after all, surely spars and oars should be varnished so that the natural splendour of the wood is on display for all to enjoy? I mean is there nothing more beautiful that a well presented set of booms and spars, painstakingly varnished with love and attention to detail and with their ends painted stunning white gloss? 

Ah well perhaps its just me then. And we all know how daft I am 😊

I have sanded the oar blades with various grit papers and given them two coats of thinned varnish. Now I embark on light sanding between coats and perhaps another 3 coats of varnish. I am not too worried about achieving a magnificent glossy lustre of aching beauty. After all, these oars are functional, there to be used. First trip out they will have gained some battle scars once more! 

For now, I  revel in the rhythmic, gentle back and forth movements of a lightly loaded paint brush. It is hypnotic, spellbinding and a period of calm after the busyness of the Christmas festivities. 

And so to a belated Merry Christmas to you all. I sincerely hope your festivities went well and that you and your families are all safe and well. Take care and happy new year to you all, despite the difficult circumstances of a pandemic which seems to have no end in sight yet. 

Fair winds and full sails to you all

Steve  


Wednesday 22 December 2021

Ready to go

 The oars are almost finished...just a couple of coats of varnish to go. The coaming is fixed and painted. 


The galley boxes are packed for a lunch cook-out on a beach somewhere. 


Now sometime next week....😄

Sunday 19 December 2021

Whilst waiting for paint to dry........

 A progress update - after three undercoats - here is the coaming repair  - just three top coats of International Toplac gloss to go

Can barely see where I had to cut out huge chunks of wet rot and insert a new piece of ply!!
(see previous posts for that saga)


The split oars are in the same place - three undercoats and now awaiting three top coats and then a sanding of the varnished looms before three coats of new varnish


In the meantime, whilst waiting for paint to dry (not really but hey.....I need a weak excuse for posting the stuff below), I have been trying to get to grips with more astrophotography. On the one hand I am getting better at taking images with my small star tracker and a DSLR. Sadly, my two telescopes were not designed for doing astrophotography and whilst I really enjoy doing the observing bit, it is frustrating not being able to use them for any imaging other than a few grainy shots of the moon. 

Above my table top beginner's dobsonian - Skywatcher Heritage 100
and below
my 150mm/750mm GOTO newtonian telescope - a skywatcher discovery 150i WIFI 

The real steep learning curve though is in the learning how to post process the images I collect. I am trying to get to grips with specific stacking software such as Deepskystacker and then with general photography processing software - affinity photo. I am getting there and have learned heaps in the last few days but it is hard work! 

Taken on the Heritage 100
I managed to botch together my basic DSLR, the end of a x2 Barlow lens, a small moon filter and a universal 1.25" T tube 

Taken on my 150mm scope using my DSLR and a x2Barlow lens

My first effort at processing the Rosetta nebula taken on someone else's telescope.
The pink colours are wrong - it should be more reddish due to the hydrogen gas clouds. 
This is where I still have lots to learn about workflow and skills using affinity photo

Shouldn't be too hard on myself - I managed to get this on my small star tracker.
It is processed in affinity photo but since I did this one a few months ago - I have learned heaps - so I might give the original data another going over. This is M45 Pleiades  by the way 

Life long learning eh? 😀

Saturday 18 December 2021

Split oars and fibre glassing oar tips

 I noticed a split in one oar so I needed to do a repair. They are rather battered oars and have seen better days but I tend to use them as temporary ones on Arwen until such time as I build a proper portable rowing seat and alter the rowlock blocks to accommodate my longer oars that I built a couple of years ago. You can find details about those oars here https://arwensmeanderings.blogspot.com/2019/04/building-oars-for-john-welsford.html

This is the starting post - there are several about making my new oars and testing them out. 


Anyway, back to the temporary ones! The split. A rushed repair, because I am hoping to sail next week. I sanded the broken areas to remove any old varnish and then on the split oar. I then cut some fibreglass tape I had over from another project long ago into strips - one I used to go across and around the blade tips - cutting darts into the cloth at each end so that it would correctly.

After doing the cloth and mixing up epoxy, I knocked in the tip of a thin flat screwdriver blade to prise the crack apart further. Trickling epoxy into the crack was difficult and I used a trick recommended to me by someone on one of the dinghy cruising Facebook forums; namely to use a shop vac - hoover in the UK - on the underneath of the crack. The suction pulled the epoxy further into the crack. It actually worked!

The cloth tips were put on and wetted out and folded over correctly . I added a little more epoxy on each side to ensure the cloth wouldn't dry out. It is a balancing act - too much and the cloth 'floats' off; too little and it dries out and there are areas where no epoxy takes. 

Its rough and there are ridges even after sanding 

Another strip was then butted up to the first on each side of the blade as well. The issue here would be the join line - because of the nature of the cloth - the butt between them would be slightly raised which would require sanding later ad possibly some fairing in. 

The end result?

The cloth and epoxy set correctly. No dry parts; no floating away from position. I trimmed off all he rough edges using my multitool saw blade and then sanded each blade. As I suspected, there was a ridge between the two sets of cloth and sanding just wouldn't remove it. 

It was now that I discovered that I have no fairing compound. I thought I did, but alas none to be found on the epoxy shelves.  After a few minutes reflection, I have decided to leave it as it is. I have sanded it all as smooth as possible but getting fairing compound now with only a few days to Christmas will be difficult.  With Omicron spreading rapidly in Plymouth and our area now one of the highest affected areas in the UK, we are trying to avoid any unnecessary contact with others so that we dont have to self isolate over the Christmas period, jeopardising plans with family. 

They are temporary oars and a rough-ish job will do. The first undercoat has gone on. I will paint the tips five coats of paint and then sand and re-varnish the oar looms and top parts of the blades. 

Friday 17 December 2021

winter maintenance on a wooden dinghy

The two previous posts outline the saga of the wet rot on part of the coaming and the subsequent repairs i have had to do. 

Today it was sanding and tidying up the plywood patch and giving it another twenty four hours curing time. Tomorrow, the first of the undercoats and pre-kotes will go on. There need to be around 10 coats of paint to build it back up to the paint layers either side. 

Off come the clamps and protective tape strips 

Everything seems to have held and cured correctly despite it only being 10C or so 

Might actually be able to get away without having to do any fairing compound stuff! 


Thursday 16 December 2021

Winter maintenance projects on a wooden dinghy

 An update then from a couple of days ago - which you can read about here - https://arwensmeanderings.blogspot.com/2021/12/winter-maintenance-projects.html


Shock, horror and mortification - I knocked a piece of the coaming 
and it fell away to reveal some wet rot

Listening to both John Welsford and Howard Rice - I opted for the safe approach and used both a utility knife and a multitool saw to remove the damp timber. As John predicted, the damp went further down and across that initial glances would have suggested. As more timber got cut away, my idea of just filling with layers of thickened epoxy slowly disappeared.  On a bright note, I'm far more skilled with a multitool than I realised 😁. the coaming is only 8mm thick and I was having to remove 4mm thickness from it! 


Fortunately, a rummage around the old scrap timber box found a piece of ply just about the right size, shape and thickness required. It also flexed in the right direction as well.  I sanded out the cut away areas and made sure that the edges were trimmed straight and sharp. Then by trial and error, I shaped the wood to fit, using my beloved Japanese handsaw to cut away tiny slivers until the shape as just about right. I did a three test fits using the clamps to make sure all was secure and correctly butted together. There was a 3mm gap at one end, the bottom edge had a 1.5mm gap and the other end had a 2mm gap as well. Not bad I guess.  


My final task before gluing up was to sort out the gluing areas. Preparation is always the key and I laid down layers of duct tape and masking tape around the area to be bonded together to catch an excess dribbles. In my experience there are ALWAYS dribbles!  

It has been many years since I last used epoxy resin and I was almost sure I had forgotten the basics but I worried unnecessarily. I warmed it up in the kitchen for an hour or so and then used syringes to measure out the five to one ratio of mix. Wetting out the 'hole' making sure enough epoxy stayed on after some had soaked into the grain, I then thickened the mixture slightly to coat the back of the wood insert piece (and its edges). 


I eased the wood insert into place and slowly applied the top corner clamps followed by the bottom ones. The key is to have enough pressure to hold but no so much as to squeeze out the epoxy. I then went around the three joins and made sure that any gaps were filled with really thickened epoxy. 

The temperature today is 11 - 12C and I am worried it will be a little cold. I know it will cure at 5C but just take ages. Because I am having to work outside on the driveway alongside a public pavement, it is difficult to rig heat lamps of any form. So this is 'wing and prayer' stuff really. 

With a bit of luck, sometime tomorrow afternoon it should have sufficiently cured that clamps can be removed and some basic tidying up and sanding done.  I suspect I will have to do some fairing work on Saturday to blend everything in. After that, three coats aluminium paint, three of pre-kote and three international Toplac. This is the paint system across Arwen's entire hull interior and exterior and it has lasted thirteen years thus far with only minor touch ups needed in a few places. 

In the meantime, most of the surrounding tape has been peeled off leaving nice clean fill lines. So far, so good. I've surprised myself. But lets not count chickens and all that quite yet! 


I then turned attention to the oars - sanding back the ends of the blades ready for some epoxy work in to the splits. This time I will also fibre glass the ends of the blades as well to protect them a little more. That is Saturday's job. Someone on FaceBook suggested that I use a hoover to suck the epoxy through the splits - nice idea - will give that a go. I mean what could possibly go wrong with me, epoxy and a hoover? 😅

There is some damp in the very end tips and 
so they are in the back room warming up and drying out overnight 


Wednesday 15 December 2021

RYA dinghy Trails for SW England

 You can find these here https://www.rya.org.uk/knowledge/dinghy-trails/sw

Two in my local patch - one for Plymouth Sound and one for South Sands Salcombe.  Nice idea, well written and well laid out. 

The Plymouth Sound one is a nice day trip but choose your weather carefully if you are off to Bovisand. Westerlies can cause a few waves into that little beach. Be aware of some hidden rocks on the beaches of Kingsand and Cawsand.  I'm not sure I would try to haul out on Jennycliffe beach either given all the rocks and gullies just off that beach (perhaps a lighter, shallower draft dinghy might be able to do it in fairness but I would certainly keep a sharp eye out on the approach in). Similarly, going through 'the bridges' from the north on an incoming tide can be an 'interesting' experience against mid tide flows. 

Go on - ask me how I know all this!!!! Some 'hard' learning experiences! 

Clever little set of very useful resources. I might try out the Brownsea Island one next year with Arwen.  Well done to the RYA and all those who contributed to the series. 


Tuesday 14 December 2021

Winter maintenance projects

 I am hoping to go sailing tomorrow. I am just watching the forecast. Not so much the winds but the rain. Our "10% chance of rain" today turned out to be constant, persistent mizzle and drizzle. That horrible penetrating stuff that all mountaineers detest. It isn't torrential. You can almost deal with that. It is the mizzle stuff - the fine drizzle that just permeates everything, irrespective of however waterproof things are supposed to be. Today has been awful with it; that and fog of all things. 

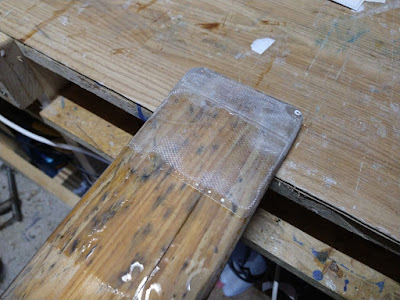
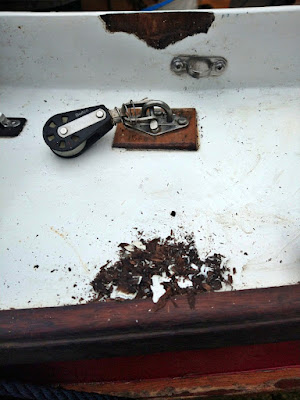
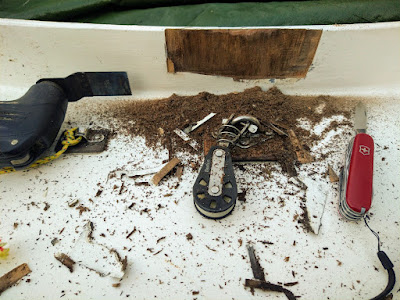
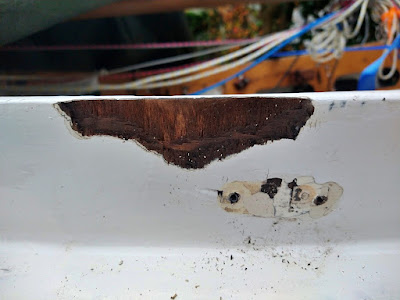
Anyway, as I was preparing to reload Arwen with all her gear, I accidently knocked against her coaming with one of the oars and to my horror, a piece just fell away. Quick examination and I discovered delamination and some wet rot.

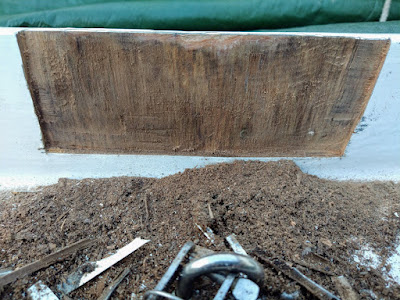
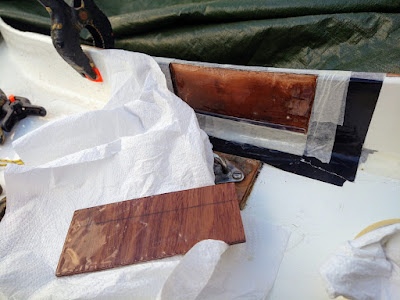
Its about a 7cm long section although I expect that further investigation will show 
it to be around 11 cm log and four centimetres deep to deck top

This is the first time in over twelve years of Arwen being left under a tarp on the driveway in all weathers, that I have ever discovered wet rot on her and I am shocked and somewhat embarrassed. I dont know how I missed it. I always religiously inspect her for damage every time I pack her away at the slipway after a sailing session. I'm quick to touch up scratches and dings with three layers of paint. Now, admittedly,  last year I only went out sailing four times in her due to the pandemic lockdowns and then because we were travelling away during the summertime on many occasions. But even so! 

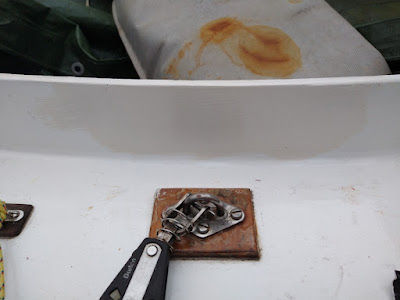
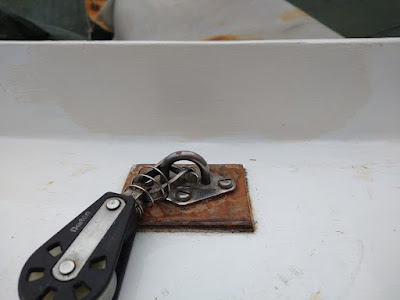
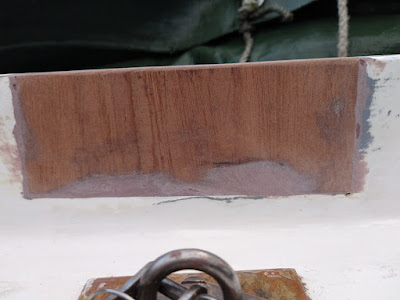
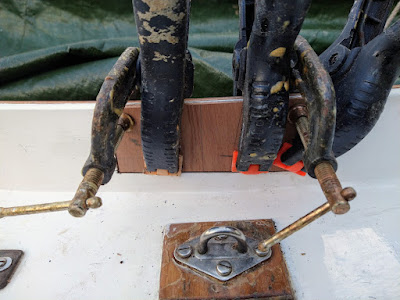
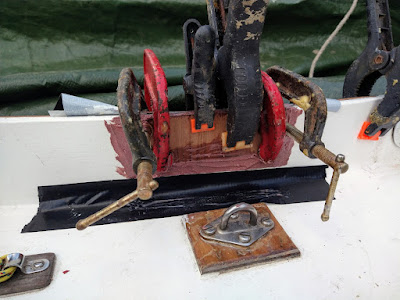
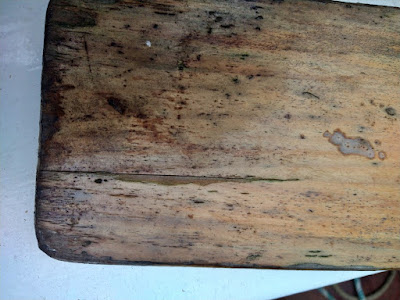
The other bit of damage occurred when I removed a deck eye 
as part of my 'inspection' of the damp damage

No excuses. I missed a hairline crack on the coaming top and am paying the price for my lack of diligence.  

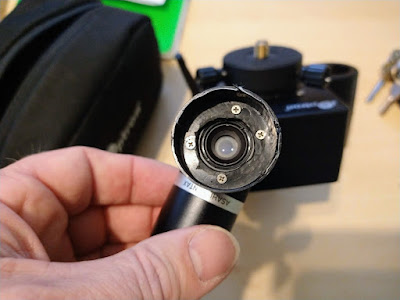
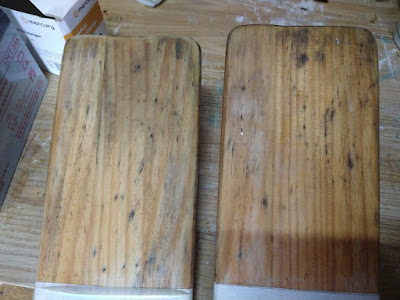
I also got another surprise. Between August and now, one of the oar blades has developed a crack. Now they were already on the winter maintenance list - a strip down and re-varnish, but I am surprised how quickly it has happened. They were a donation to me and are around 12" too short in length to be effective. 

These need a sand down and further inspection but the split is obvious along a former glue line.

I did build a new set of longer length oars but discovered when first using them that I was going to have to adjust the oarlock positions and seated rowing position to use them more effectively, hence I carry these older ones for now. A temporary solution. (One of my ambitions for 2022 is to actually learn how to scull). 

So, to the repairs. 

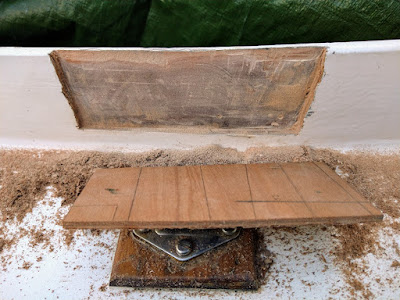
My initial thoughts with the coaming was that I would have to cut out the effected area and then laminate in a new piece of ply coaming. Now I always think it is a good thing to know well your limitations. So, I immediately went to the JW forum and Howard Rice rode to my rescue. Not the first time he's done that for me, bless him. A generous soul. 

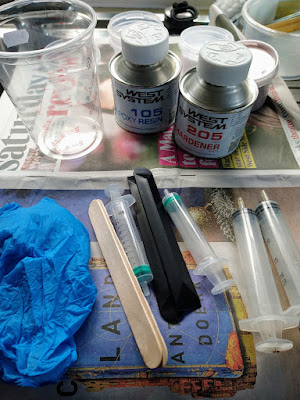
The oar blade is simple  - pry the split apart very gently to ensure the wood is dry. Then mix some epoxy and use a kids little paint brush to get it into the gaps to wet the sides. Mix a little thickened epoxy and squeeze that into the gap before clamping the blade together. Remove any excess squeezed out and when hardened sand lightly. 

Howard also suggested I glass the oar blades with 6 oz glass, or at the very least do the blade tips and then perhaps paint the blades a complimentary colour. I could use the rustic red - which is the colour of her sheer plank. 


As for the coaming section - Howard's recommended advice, endorsed by others, seems to be:

  • use a sharp blade to enlarge the soft area and area where paint is coming off until I reach dry, solid wood. less taken off is better i.e. stop as soon as solid wood is reached
  • dry the area with a lamp or heat source - SWMBO has a very nice hairdryer - although I suspect standing there with it for an hour or two is impractical - so lamp it is 
  • mix up some unthickened epoxy and wet out the dry wood
  • mix remaining mixture with wood flour to thicken and use plastic squeegee to spread it evenly over the surface - fairing it in with the surrounding surface. I suspect I will have to build it up in layers, allowing each one to dry out first.
  • once the required depth has been done and faired in, block and sandpaper gently to fair all surfaces. i could use West epoxy fairing compound mix - I have some left on one of the shelves - for that final top layer
  • After it is dry - it will be painting - three coats aluminium flake paint, three of pre-kote and then three of international Toplac gloss coat. Up until now this combination of nine coats has been pretty much bomb proof on Arwen. even on high roller wear areas of her hull, I have never been through the alu flake layers. 
Over the next couple of weeks, I will look for any other hairline fractures and gently fill them with mixed epoxy before sanding and painting them over. 

In the spring, when we get a good spell of dry warmish weather, I'm wondering if I could design some temporary, simple, poly tarp tunnel affair out of water piping, wooden timber joists and cheap tarp - just to put over Arwen when I have painted her. It would allow air flow through but keep off the dust, leaves and moisture. 

Wish I knew someone local who has a large covered, empty space available for a fortnight! In the meantime, here is an example of the power of FaceBook for something good.... 

My thanks to Howard and Ben and all the others who contributed similar tips. Much appreciated, and of course, I will post any repair details here. 

After finding these maintenance issues, I then inspected the spars and mast and all seems fine with these. I took the opportunity to adjust the lacing of the sail to the top yard. Several people last year, including a sail maker at Jeckells,  observed that a possible cause of the diagonal crease I get from the bottom of the top yard to the clew on the sprit boom might be due to too much tension in the top lacing to the top yard. So I loosened it and readjusted its position on the yard. I also moved the tie on ring on the top yard a little so that it falls 35% of the way back up the yard. Hopefully this will help as well. 

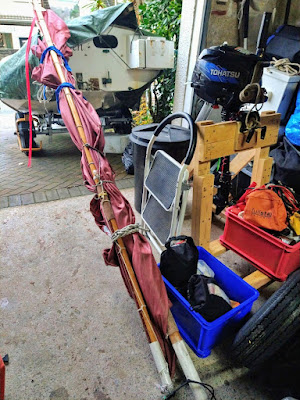
Its all checked and ready to load back into Arwen 

Over the last few years I have carried two anchors even on day sails. One is an 8lb Danforth with four metres of chain. The other is a donated hefty Bruce weighing 15lbs with five metres of chain. Overkill I suspect. This latter anchor is a nightmare to stow aboard Arwen. I keep it in a tray on the floor forward of the centre thwart - it is strapped in and held in place but I keep tripping over it and/or grazing my chins on the damn thing. 

This donated grapnel anchor (10 lbs) may prove useful as the occasional 'stern anchor' when camp cruising and I will return my danforth to the main anchor for a temporary trial this coming season. Thus far, it has never let me down, even in strong tidal flow areas.  I know a grapnel should never be used as the main anchor but for picnic stops or stern line - it should prove useful. 

Normally I stow the danforth in a tray on the floor on the cockpit floor forward of the centre thwart on the port side. The warp end is run outside of the shroud plates and through a bow cleat before being tied off on the samson post (is that the right term - it doesn't feel right - but I can't remember what the correct term is - poor old memory worsens more rapidly by the month but hey ho there we go). 

I know that many navigator owners store their anchor and warp in the well on the starboard side. That is the same side that my outboard is mounted (on the stern) so I have often wondered whether I would cause a trim problem by doing this - hence its port storage site.  More things to ponder! 


Now big decision, should I be brave and go out tomorrow in what will be light-ish winds, foggy murk and lots of persistent drizzle OR should I be sensible and go to the chandlers to get some new epoxy supplies and start thinking about these repairs? 

OR, I could just go and launch and retrieve Arwen a few times until I get used to the new trailer (which I haven't dipped in the sea yet) and then go to the chandler afterwards! 

Thank you to all those who gave advice - deeply appreciated as always. If you have any further thoughts, please do drop me a comment below. In the meantime, I wish you and your families a Merry Christmas and Happy New Year in what I know are, for many of you, difficult and trying circumstances. Please stay safe and well. 

Steve