Arwen's meanderings

Hi everyone and welcome to my dinghy cruising blog about my John Welsford designed 'navigator' named Arwen. Built over three years, Arwen was launched in August 2007. She is a standing lug yawl 14' 6" in length. This blog records our dinghy cruising voyages together around the coastal waters of SW England.
Arwen has an associated YouTube channel so visit www.YouTube.com/c/plymouthwelshboy to find our most recent cruises and click subscribe.
On this blog you will find posts about dinghy cruising locations, accounts of our voyages, maintenance tips and 'How to's' ranging from rigging standing lug sails and building galley boxes to using 'anchor buddies' and creating 'pilotage notes'. I hope you find something that inspires you to get out on the water in your boat. Drop us a comment and happy sailing.
Steve and Arwen

Thursday 28 July 2022

Dinghy cruising overnighter to cellars beach on the yealm - episode two

 hope you enjoy it


Lessons learned?

  1. move the halyard tie on point on the yard further up so it is about a third of the way along - hopefully this will allow the sail to pull right up to the mast
  2. move the sprit boom intersection point on the mast far higher
  3. make sure I remember to tie on the parrel beads at the tack - around the mast
  4. crank on the downhaul tension - this may need an upgrade in the block and tackle used 😂
  5. add a parrel bead loop at the bottom of the yard where the throat is to hold it securely against the mast - not so tight that the sail cannot be lowered effectively though 
Out tomorrow with those changes , so it should be interesting to see what happens.

A write up of the latest overnighter to cellars beach will appear on the blog in the net few weeks - watch this space as they say 

Friday 22 July 2022

Cellars beach on the river Yealm

 Here is episode one of a trilogy about an overnight trip to and from Cellars Beach just inside the mouth of the river Yealm on the south Devon coast. 


https://youtu.be/YOcu1MTdggE


Monday 18 July 2022

Cellars beach on the river yealm

 A little teaser of a forthcoming set of videos about a recent trip. Enjoy

https://youtu.be/YOLIJZj2A9o


Wednesday 13 July 2022

dinghy cruising on Plymouth Sound - in a Welsford navigator - part three

 here is part three about our little day cruise potter a few weeks ago around Plymouth Sound, when, after living down this way for over thirty years, I finally set foot on Drakes Island for the very first time.


Parts one and two can be found in previous posts during June/July 2022 or on my YouTube channel at www.YouTube.com/c/plymouthwelshboy


https://youtu.be/MHIroBMEZnI


Thursday 7 July 2022

dinghy cruising - a Welsford navigator pottering on Plymouth Sound - part 2

 Here is the part two video of our day pottering around Plymouth Sound and landing on Drakes Island for the first time ever. Part one can be found in a previous post. 

https://youtu.be/HDEezgAzetI


Friday 1 July 2022

The Dinghy Cruising Association new photography, videography and art work competition

 You may be aware that the British Dinghy Cruising Association has created a competition to go alongside ones for the best technical article and best cruising log in its journal. This new competition centres on photography, videography and artwork with monetary prizes in the form of Amazon vouchers. 

DCA website: https://www.dinghycruising.org.uk/news/dca-launches-a-photo-competition 

An article I wrote for the DCA journal about the competition is published instead as a PDF download on their website and can be found in my previous blog post. At the end of that post, I promised that I would also post answers to two further questions, which being very specific about photography, probably weren’t appropriate for inclusion into the journal or on the DCA website

These two questions were:

               What equipment can I use to get a ‘pleasing’ dinghy cruising related photograph?

               What basic photographic skills would I need to develop in order to obtain this photo?

If you have read the article/first blog post and are now feeling inspired but left wondering whether or not you have the right camera gear (you do by the way), then perhaps this section below will help you further.  


What equipment can I use to get a ‘good’ and suitable dinghy cruising related photograph?

Simple answer – any practically any camera you have as a good photo comes from the skill and knowledge of photography employed, not necessarily the actual camera used. In saying this however, there are some things to consider and I discuss 
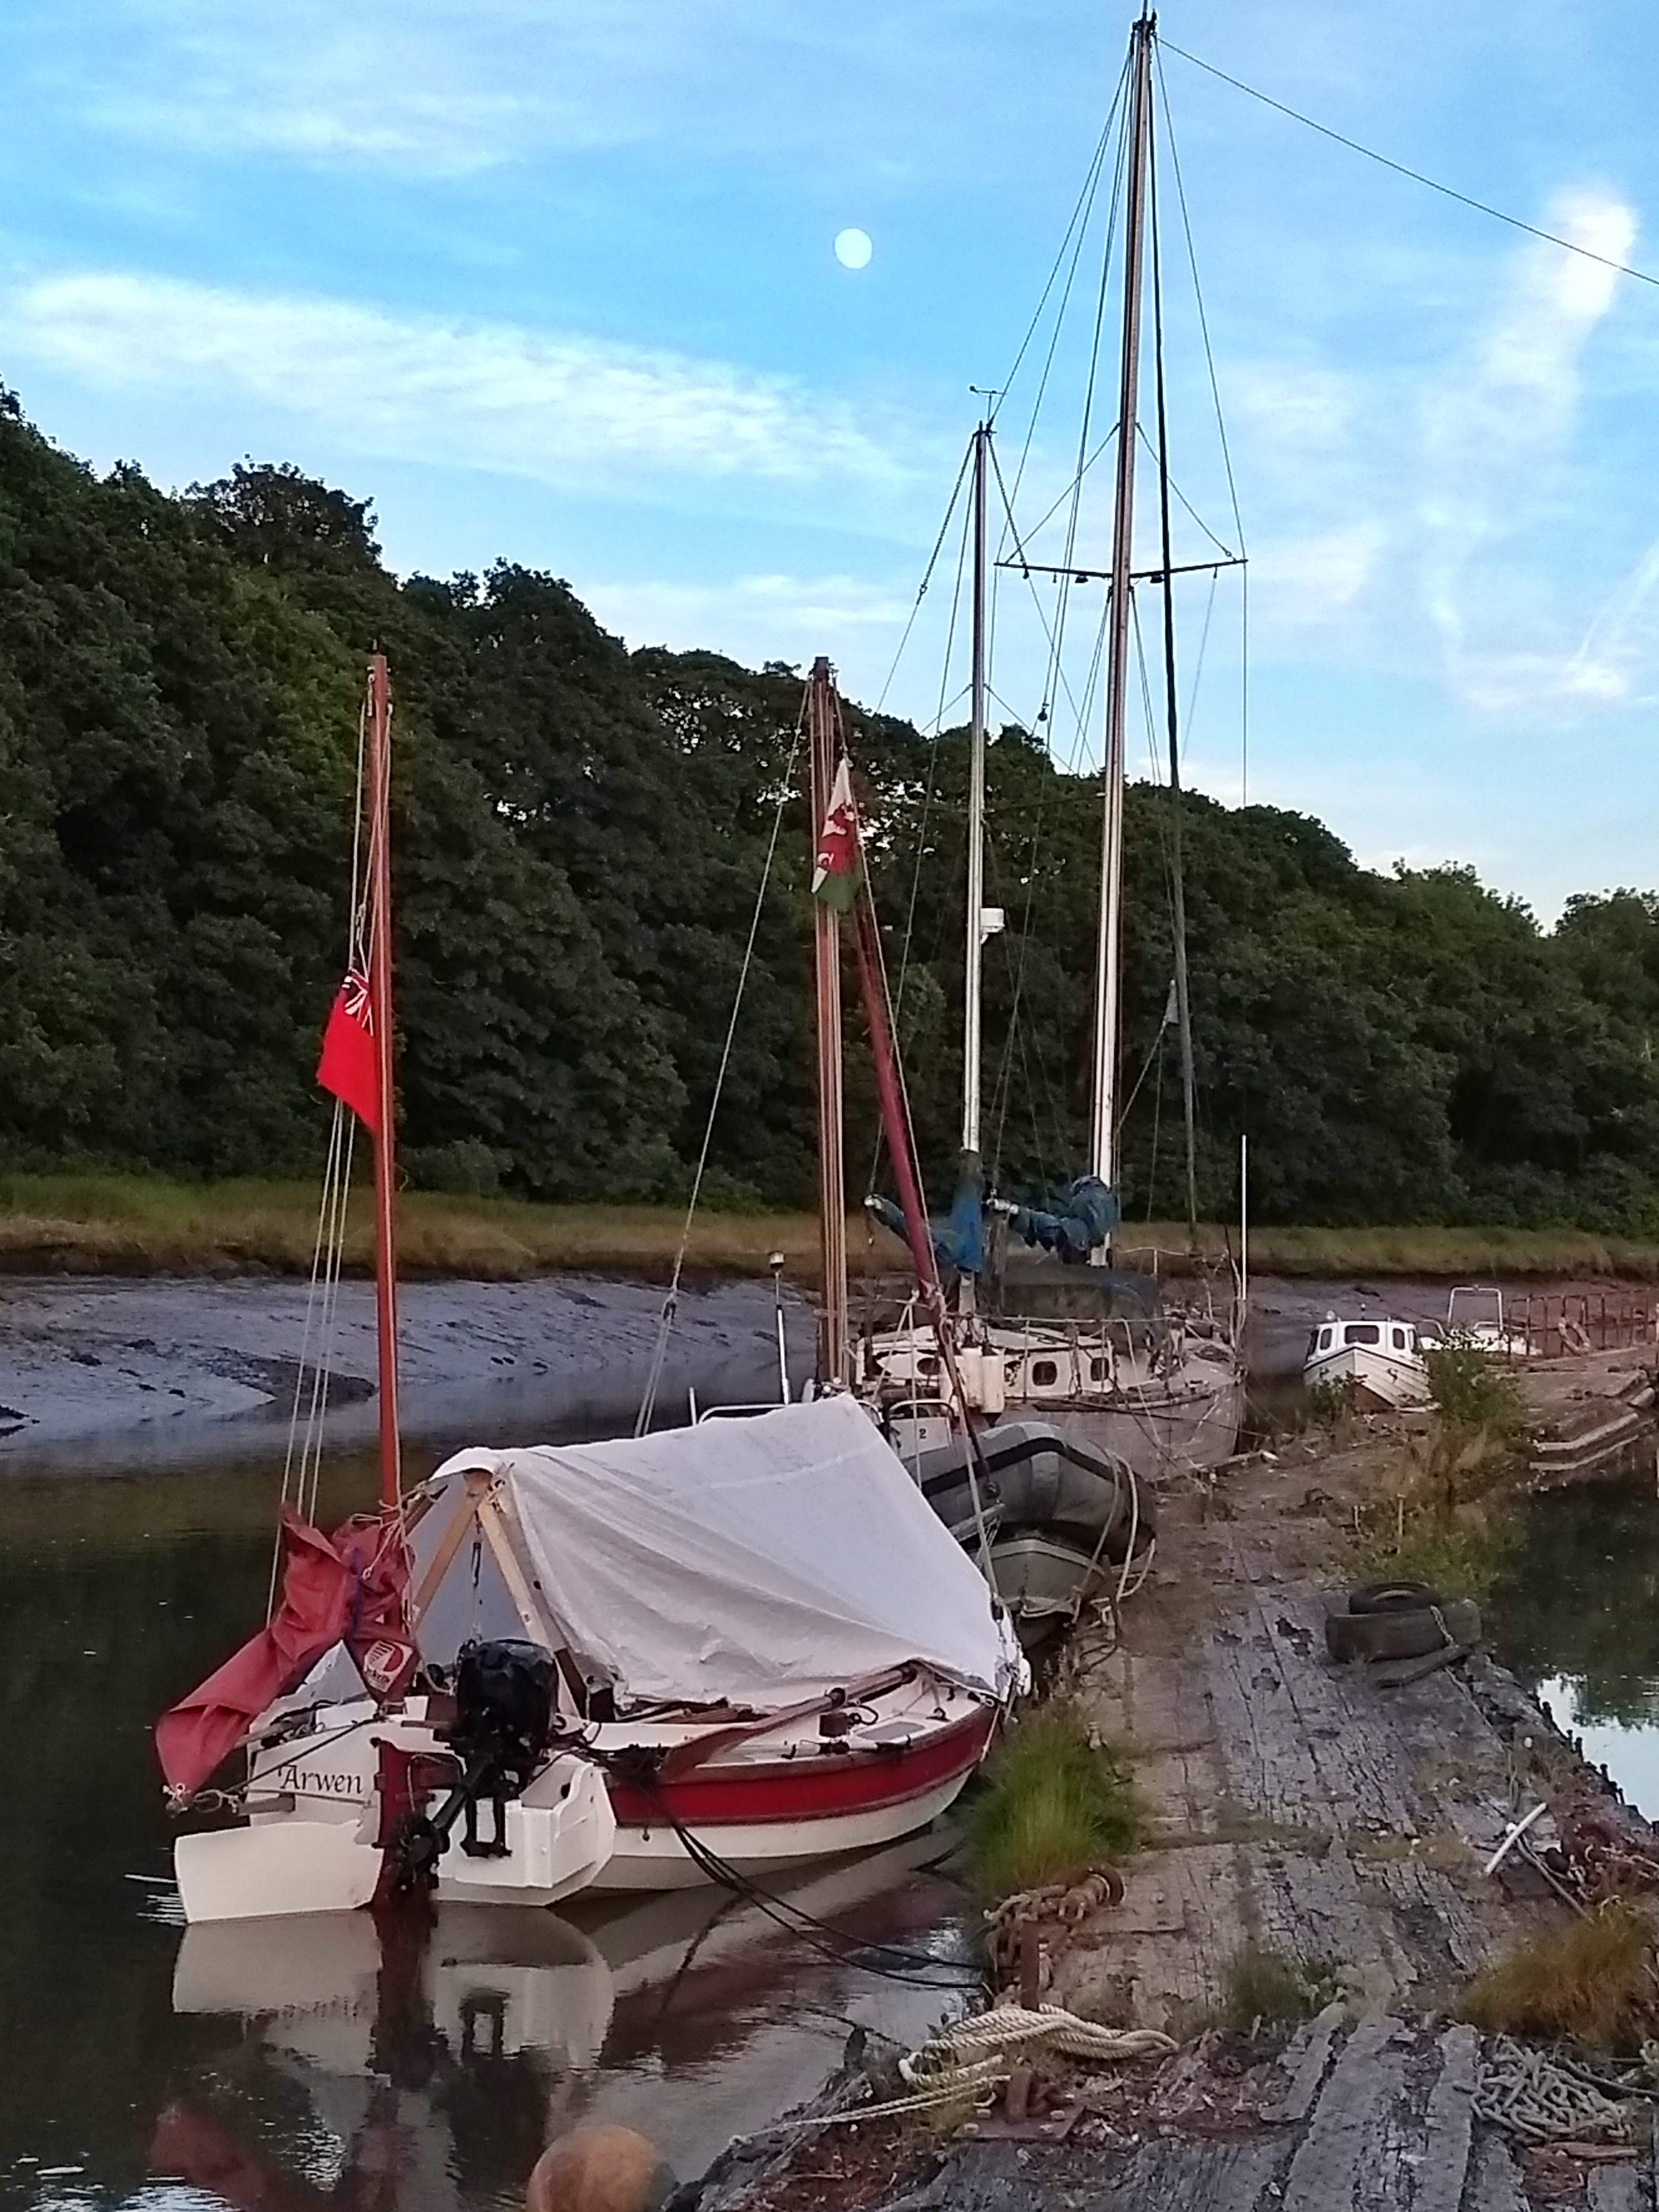
these in the context of my own camera equipment.  Let’s start by looking at what camera equipment I carry on Arwen (figure 1).
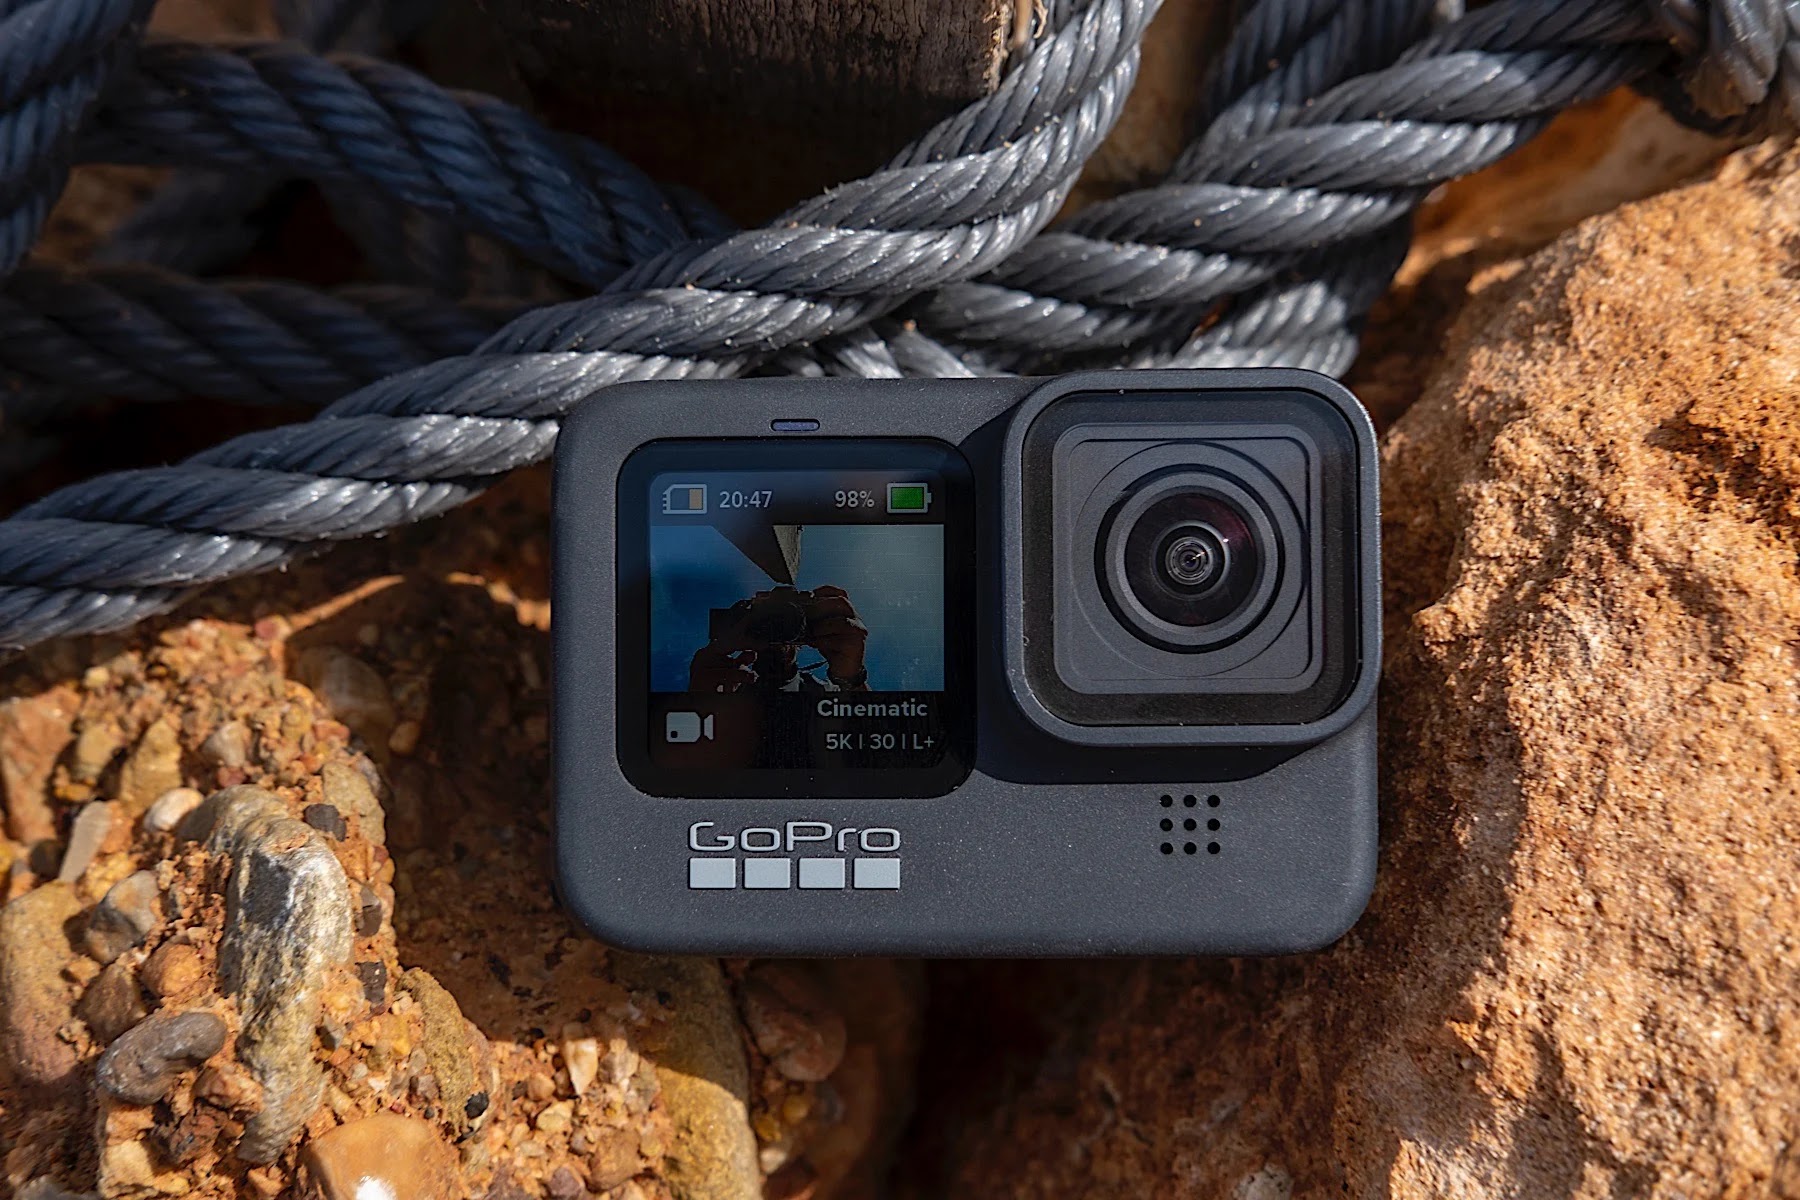
Figure 1: what photographic equipment do I carry on Arwen?

As standard:

·        GoPro Hero 9 on long selfie pole (plus spare batteries and various mounts etc)

·        Two GoPro Hero 5’s and assorted mounts/fittings (plus spare batteries etc)

·        Sony HX-90 compact digital optical zoom camera (plus spare batteries) in waterproof pouch and dry bag

·        Spare micro-SD memory cards which can fit any of the cameras) – minimum 64Gb class 10

·        Camera cleaning kit – cloth, lens spray, puffer brush)

·        Clamp mounts for GoPro

·        Mini Gorillapod tripod for compact zoom

·        One portable power bank

·        Either a Camera rucksack or a camera strap bag – On a small boat, you may find a rucksack too bulky, so a shoulder bag is better. On shore, I keep the latter securely on me by slinging the strap over my left shoulder and across my chest front so that the bag lies on my right hip as I am right-handed. Everything is then secure and easily accessible. Contents are in small waterproof drybags which are labelled on the outside. In the boat, I have it all in a small photographic rucksack, inside a large drybag.

·        Lens wipes – I use them rather than the bottom of my fleece (We have all done it!)

Occasionally:

·        DSLR Canon 800D plus 18 – 55mm F/4.0 and 55 – 250mm F/4.5 zoom lenses (spare batteries)

·        Lightweight full-sized tripod

·        Spare lens caps

·        UV filters on lenses - protects them from scratches, salt and spray

·        Circular polarising filters for both lenses – great for sunny days - eliminates unwanted glare off the water, saturates colours and increases the contrast between the different elements in a shot

·         Lens hood prevents light flaring on lens and protects camera against accidental knocks.

Very occasionally – for astrophotography

·        Above camera plus Samyang 135 mm F/2 lens

·        Skywatcher Star Adventurer 2i pro star tracker

·        Benro carbon fibre full tripod – you can get very cheap second hand tripods off Facebook marketplace etc  - a tripod allows you to use telephoto lenses in low light on a DSLR  - stability without camera shake when you need wider apertures and longer shutter speeds but no flash.

·        Samsung Galaxy Tab A tablet

·        If you are taking photos at golden hour from land – get a remote shutter release cable as well to avoid any camera shake when taking a photo.


My compact zoom camera (a Sony HX90 – also a great vlogging camera by the way) and GoPro Hero 9 (for those exciting spray over the coaming/raining moments, when a small waterproof camera is needed or for getting those good close-up shots of crew in action) are the two main cameras I carry regularly onboard. My smartphone, a middle of the road one with ok-ish images (but not ones that could be enlarged for printing off) lives in an aqua-pouch when onboard so effectively eliminating its function as a camera.  Occasionally in relatively sheltered inland waters like the River Tamar, I take my bigger DSLR although I rarely use it when actually sailing. One handed DSLR camera photography is something I’m unlikely to master any time soon.


A recent ‘digital camera beginners’ course’ enabled me to ‘get off auto’ and ‘engage with ‘manual’’ on both my compact and DSLR cameras. My Canon 800d DSLR with various kit lenses gives me the most choice, control and quality over images. DSLRs (and mirrorless cameras) give very high-quality images, are bigger and easier to hold, have larger rear touch screens and relatively quick autofocus.  Great onshore, or if you are in a boat not helming or crewing; impossible to use well if you are ‘active’ in the dinghy. If it isn’t a weatherproof one, they aren’t great with saltwater spray!  Mainly used when I have finished sailing and am moored or dried out, the DSLR accompanies me on shore explorations and is my astrophotography kit for night time. I can choose aperture, shutter speed, ISO and control depth of field and focus. Tack sharp background or bokeh blurred? This kit gives me those options.


An alternative to the DSLR is a ‘bridge’ camera. It is mid-way between a point and shoot compact and a DSLR. It has a tripod thread, a flash shoe and control over exposure, aperture, shutter speed and ISO (light sensitivity). Visit the ‘Lone kayaker’ website at   https://thelonekayaker.wordpress.com/     to see one used well. All of Rupert’s images taken from his kayak are on a bridge camera which he stores inside a dry bag!

Figure 2 gives some reviews of bridge and DSLR cameras on the market today. If you chose a bridge camera or DSLR – find one which has a dial or buttons to manually control exposure, ISO, aperture etc. Trying to access a menu on a screen with wet fingers is a disaster waiting to happen!  Avoid digital zoom as any image done this way will lose sharpness and stores little information for later post processing. You want optical zoom!

Figure 2: reviews of DSLRs and bridge cameras (I take no responsibility for the quality of the reviews)

Best entry level DSLRs 2022

https://www.techradar.com/uk/news/best-entry-level-dslr-camera

https://photographylife.com/best-entry-level-dslrs

and slightly more generally https://www.t3.com/features/best-entry-level-camera

bridge cameras

https://www.digitalcameraworld.com/uk/buying-guides/the-best-bridge-cameras

https://uk.pcmag.com/digital-cameras/85599/the-best-bridge-cameras

The Sony HX-90 digital/optical zoom compact gives me great picture quality, a x 30 optical zoom lens, a flip up backscreen and inbuilt flash. Small and lightweight, it almost does what my DSLR can do. Most sailing days I’m happy to get this out of its waterproof storage bag to take photographs at its widest lens opening and I can use it one handed. I can shoot in RAW mode (better for post editing, enlarged prints and magazines) and I avoid ‘digital’ zoom which degrades the image quality. Bobbing about on waves and trying to do telephoto zoom shoots with it are just never going to happen, so I use it on its widest focal length and best quality settings; enabling me to then crop the image in post editing without losing image quality. Of course, it’s now dated, overtaken by action cameras and waterproof smartphones and newer compact cameras, but it still does the job and I’m sentimentally attached to it as it was a gift given to me when I retired.

Those who know me well know I am an action cam – GoPro aficionado! There are many good action cameras available now and my previous articles on vlogging in the DCA journal and also posts on this blog give a good overview of these. Personally, I only use GoPro or DJI Action for photographs and I favour action cams with a front screen that shows me what I’m photographing when using for selfies (it’s also a vlogging advantage).  My various GoPro’s have been bomb-proof over the decade I have been using them. There are plenty of YouTube videos about settings for your GoPro camera and figure 3 shows what photo settings I have for my Hero 9. Remember on any camera or advanced smartphone, RAW format gives you best quality images and plenty of options for creative post editing.  Magazine editors prefer RAW as well! 


Figure 3: my GoPro photo settings for Hero 9  Note -  it has a fixed aperture of F/2.8

Photo – linear, Superphoto, timer 3s, zoom 1.0x, WB – auto, sharpness – low, colour – GoPro

Night photo – wide, shutter – 30s, RAW, TIMER – 3S, ZOOM 1.0X, wb – 5000K, ISO min – 800, ISO max – 1600, sharpness – low, colour – flat

Burst mode – wide, burst rate – auto, output – standard, timer – off, zoom – 1.0x, WB – auto, ISO min – 100, ISO max – 3200, sharpness – high, colour – GoPro

Use self timer – if you want to be in a shot. Touch zoom slider can bring a closer view of the action. 

My GoPro excels at those really big landscape shots (choose linear mode) and those onboard boat close ups. Avoid super wide settings (distorted fish eye results with curved horizons) and don’t use them for distant shots – they were never designed for telephoto images. You just won’t be able to crop in effectively during post production editing!

Now, I am going to be slightly vague here because I have to confess, I have never owned a decent smartphone. SWMBO draws the line at expensive smartphones. Mine is a lower middle end smartphone, non-waterproof, but which does reasonable images. Great for social media but not much else. It gets used mainly for navigation and texts and that’s it. Great for wide angle images, upmarket smartphones now do great telephoto shots as well but the risks of dropping it overboard? Getting it wet? I’m not that brave given the higher costs of the better equipped phones.  If you are braver than me, then your high-end smartphone should do portrait and landscape mode, render good flash and allow a fair degree of manual control over exposure and some settings like aperture. Some will blur the background whilst keeping the subject of the image pin sharp. Several even allow you to ‘magic away’ distractions in your photos. And of course, they are great for spontaneous use; after all, we carry our smartphones with us everywhere.

Figure 4 gives some websites that review waterproof compact digital cameras and smart phones

Figure 4: reviews of waterproof digital compact cameras, digital zoom cameras and waterproof smartphones  (I take no responsibility for the quality of the reviews)

Best waterproof digital cameras:

https://www.digitalcameraworld.com/uk/buying-guides/best-waterproof-cameras

https://www.techradar.com/uk/news/best-waterproof-camera

https://www.amateurphotographer.co.uk/buying-advice/top-12-best-waterproof-and-underwater-cameras-164057


Best budget compact digital zoom cameras:

https://www.digitalcameraworld.com/uk/buying-guides/best-compact-camera

https://www.digitalcameraworld.com/uk/buying-guides/best-point-and-shoot-cameras

https://www.techradar.com/uk/news/best-compact-camera


Waterproof smart phones;

https://www.digitalcameraworld.com/uk/buying-guides/best-waterproof-phone

https://www.techadvisor.com/test-centre/mobile-phone/best-waterproof-phone-3789597/

https://www.tomsguide.com/uk/best-picks/best-waterproof-and-water-resistant-phones


If you have an existing compact, bridge or DSLR camera here are some quick tips to help maximise the image quality in your photo. Firstly, more pixels do not necessarily mean better quality pictures. It is sensor size which is important. The more information your sensor holds, the bigger you can enlarge a photo when printing it off. Secondly, if you are buying a new camera, get a reputable make – Canon, Nikon, Sony etc. Thirdly, APS-C on DSLRs means it is a crop sensor but it will do absolutely fine. Full sensor size DSLRs are very expensive!

Fourthly, no surprise here but salt water smears lenses lens and rusts metal fittings! Some DSLRs are not weatherproof. Those that are tend to be very expensive. Protect your DSLR by getting a giant zip lock freezer bag, cutting a hole for the lens to poke through, sealing the camera in the bag and securing the bag opening over the lens with a thin stretchy elastic band. Well, that’s how I do it.  For your compact, if it isn’t a waterproof one, you can buy water proof pouch bag specifically designed for optical zoom lens compacts. Make sure you get one that can accommodate your compact on its full optical zoom lens stretch – go on – ask me how I know that’s important!!  Invest in a good brand if you buy an aqua pouch for your compact or smartphone. Cheaper versions leak – go on, ask me how I know – again!!! Put two little bags of desiccant into any bag that holds a camera or smartphone – they absorb any moisture trapped in the bag. 


Ok, so at this point we have briefly discussed basic photographic equipment considerations. Now a public service health warninggo no further unless you want to learn how to get off ‘Auto’ mode and into ‘Manual’ mode on your camera, smartphone or action cam. The last bit of this blog post finishes by examining some very simple, basic, beginner principles about shooting photographs. This is just for those who like me dream of getting off ‘auto’ camera mode just once in their lives!

Our final question:  

What basic photographic skills would I need to develop in order to obtain that ‘good’ photo?

If you haven’t done so yet, I would strongly urge that you read the article in the DCA journal or the first blog post about the competition and what makes a ‘good’ boat photograph. By doing this, the following will then make better sense! The article looks at what makes a good photo and discusses aspects to do with composition.


Some pre trip thinking about camera settings is very important. If you want the best possible quality photographs for inclusion in a magazine or to enlarge as prints of 8” x 10” or above, shoot and save images in RAW format but expect some post editing in a photo editing software program afterwards to get the best out of the image. RAW format images give you the most information and detail.

If you want photos for a personal album, a blog or an ‘Instagram’ post, JPEG’s are perfectly fine and take up less room on your memory card; just dial in the highest quality JPEG setting your camera can do. My DSLR, GoPro and compact camera can shoot both simultaneously. My smartphone shoots JPEGs only.  Newer smartphones can shoot in both JPEG and RAW. Quick warning reiteration – RAW images never look as good on your rear-view screen as JPEGs do – but after post processing – oh my do they pop then. Always, always select the best/highest quality megapixel resolution/ image size setting your camera can do. It will need a bigger memory card but will be worth it. Magazine editors by the way, will love you for that choice!

And talking of these worthy individuals, resist any temptation to digitally auto enhance any images you take for magazines. Let the editors and their team do it as they know what they are looking for and what will best fit their page layouts.

Your camera on auto setting will give you good pictures straight away as it selects the optimal exposure, shutter, aperture and ISO speeds. Don’t be afraid to use auto mode at sea. In lower light or where you are suffering camera shake, select TV (shutter) mode as it allows you to choose the shutter speed. The camera will then automatically select the most appropriate ISO and aperture settings to get you a correct exposure at that shutter speed. However, I like to exert greater control and thought over exposure and focus in an effort to really boost image quality and detail, and so I have been familiarizing myself with manual, shutter and aperture modes on my cameras. It is not within the scope of this article to give detailed advice about camera settings but getting off ‘auto’ is fun and there are plenty of YouTube tutorials explaining how to adjust shutter and ISO speed, aperture and exposure compensation. Look up ‘The exposure triangle’.

On some compact zoom cameras and most DSLRs, either via a dial or through a menu set up, you can select from M (manual), AV (aperture), TV (shutter) or P (auto) modes. By now, you are beginning to realise that there are three things to consider in getting a well exposed photo: shutter speed, aperture and ISO. So, let’s look at each of these a little more closely, through the context of this ‘Exposure triangle’.

Shutter speed is how long your shutter remains open and is measured in seconds or fractions of seconds e.g. 1/60th, 1/500th. Fast shutter speeds freeze action e.g. water splashes and spray over the deck and let in little light; also good to use if using long telephoto lenses or shooting fast moving boats. Long shutter speeds (shutter is open longer) allow more light onto the sensor.  Turn on the camera’s image-stabilization system and you can shoot at slower shutter speeds (1/15, 1/8, or 1/4 of a second) to keep the boat in focus while blurring the water. The latter technique is easier toward sunrise and sunset, when light levels are lower.

Changing the ISO (sensor sensitivity) will capture more or less light. The higher the number you choose, the more light it captures, but at a cost. The higher the ISO, the ‘grainier’ the picture will become!  To capture images of boats sailing, set your ISO speed to between 100 – 400. For example, on bright sunny days choose a low ISO around 100 because you have plenty of available light. On an overcast day, you might set it to 400. Remember, don’t go higher though as this will lead to a ‘grainy’ picture and that is something you want to avoid. High ISO speeds do however, allow faster shutter speeds. (See shutter speed above).

Your choice of aperture (how wide open your lens diaphragm is to let light through) determines how much of your shot is in focus. A wide aperture, (the smallest ‘f-stop’ number) allows a fast shutter speed and more light through, thus reducing motion blur. It ‘freezes’ any action and gives a shallow depth of field (only the subject is in focus, the rest of the image may be blurry). Increasing the aperture (a higher F number) brings in more motion blur, less light but more depth of field so the background comes into focus more.  In low light, use a wide aperture (a small F stop number) and a slow shutter speed but remember you will need to use a tripod or prop your phone/camera on something to hold it steady to avoid shake blur. I would also set a shutter timer delay (on most phones and cameras) so that when you press the shutter button, the camera delays taking the photo for a few seconds so that any camera shake settles down before the image is taken.

If you want that ‘looking along the length of the boat’ shot to be in focus from foreground to background then you need a big depth of field so select aperture priority mode on the control dial and set aperture to between f16 - F22. The bigger the f/number, the bigger the depth of field. The camera will automatically set shutter speed and ISO appropriate for the day’s conditions. If I wanted just the boat’s foreground in focus but the background blurred (called bokeh), I need a small depth of field, so apertures of f8 or below.  A good general shooting setting for reasonable depth of detail across your image is f8 - f16.

You can read more about the exposure triangle here at:

https://petapixel.com/2017/03/25/exposure-triangle-making-sense-aperture-shutter-speed-iso/


Diagram 1 – the exposure triangle. This diagram shows the simple relationship between shutter speed, aperture and ISO and what impacts altering each has on depth of field, grain and sharpness.

For a good video explanation try this one from PhotoPills  https://www.youtube.com/watch?v=WA8JGwnxjBw

And for smart phone camera users, this may help as well: https://thesmartphonephotographer.com/exposure-triangle/

Remember, it sounds complicated but once you have your head around the basics, it becomes easier to understand. If you want to move onto manual – practise onshore before trying it for the first time from a boat!

Some quick tips about other settings, mainly on DSLR cameras. If you are using a DSLR camera to take a photograph of a boat, from another boat, keep lens auto focus and image stabilization switched on. If you want to keep the moving boat permanently in focus switch your camera autofocus mode from ‘One shot’ (or AF-S) to ‘Servo’ (or AF-C) and this will allow you to half press your shutter button to continually focus on the approaching boat until you are ready to take the shot.

I set white balance to auto when saving RAW images as I can alter them in most post editing software programs and if truth be known, trying to remember to manually set up my camera for the correct white balance every time I take a shot is beyond my limited brain capacity. My friend, saves in JPEG’s, and chooses a white balance option mode from his camera menu, suited to the conditions on the day - bright sunlight or cloudy skies.  Remember out on the water, the sky, water, sails and hull may be over bright so familiarize yourself with how to alter your exposure compensation if using a DSLR. When your camera’s light meter reads ‘0’, then exposure is correct. +1 means the image is over exposed (too bright) by one stop. Conversely, -1 on the meter tells you that your image is under exposed (too dark) by one stop.

If you have worn polarising sunglasses at the seaside, you know that glare disappears, and in clear water, you can see the sandy bottom, the seaweed and scuttling crabs with startling clarity. A polarizing filter on my DSLR lens achieves the same thing, reducing glare, removing unwanted reflections and intensifying the blues and greens in the scene. It also makes white fluffy clouds really pop in bright blue skies. Be aware that the filter will often reduce the light entering the lens and so if shooting in aperture priority mode, your camera will slow shutter speed slightly to compensate for this. To ensure I get that ‘freeze the water’ shot, I have to remember to raise the ISO setting a little higher.


Oh, and one more thing, I turn off any date, time or GPS location stamps that might imprint on the final image. An irritating way to spoil a perfect shot!


When you have got the images, it is time to take them back and process them. If you are doing them for inclusion in a printed magazine, definitely talk to the editor before processing your images. They may just want you to send them the RAW file so that they can make editorial decisions about processing, cropping etc. If you are wanting to print it and frame it, try not to amend the image too much. Don’t over process it!  Less is more! Do just enough to keep yourself happy. Focus on subtle iterative adjustments to exposure, contrast, highlights, shadows, clarity, vibrancy and saturation (depending on the post editing program you use – I use Affinity photo). Use Youtube tutorials to get better at the post processing skills.

If using a DSLR or a GoPro you will do most of this editing once home. With a smartphone, there are many apps which will allow you to do it there and then. Editing and posting on the move – amazing!


What about using a drone camera? You haven’t mentioned that yet Steve! Um, possibly with good reason! On My drone I have some control over exposure, aperture and shutter speed settings or I can just go auto! You’d better be a really good drone pilot before venturing it out over water or taking off and landing on a boat! Know exactly how long your batteries last and leave spare battery time for possible tricky landings. Disable the ‘return to home’, ‘collision avoidance’ and ‘distance limitation’ settings. On a moving boat, you won’t still be where you took off, even if you are anchored! You may need to grab it by hand on landing! So, wear protective gloves! Learn to watch the screen not the drone and have an observer watching the drone position. Take into account wave and wind conditions. Good drone shots include looking vertically down on the boat, centred over the mast. Try not to over expose your image. If you have polarising filers to fit the drone camera, use them. Set exposure settings to the boat not the surrounding sea. Great location shots are when the boat is anchored in a stunning bay in the evening and you can fly the drone lower to catch the boat against the backdrop of a cliff and/or beach.

And finally, (well done by the way on making it this far), lets finish with a few more useful tips.  Ready to take a photo of Arwen and armed with correctly set equipment and shot lists (see previous post), I do try to ensure she is tidy and clean and looking her best (tip 1). So many of the photos my friend took of my boat last year were rejected because I’d forgotten to take in fenders on the starboard side or allowed strands of reefing line and snotter control halyards to dangle across my face. Worst was my display of poor seamanship skills, through a sail with a huge clew to throat crease. So, no baggy sails, no loose lines, no cluttered cockpits and no dragging fenders; just a tidy, clean, boat displaying a good turn of speed, full sails and water flowing serenely along its hull. If only!

My planned ‘shots’ list for the day serves as a memory aide but I won’t stick rigidly to it. I will develop situational awareness (tip 2) from the start by sitting back a while before shooting and taking a look around the sailing area I’m passing through. If I’m crew in another boat shooting other peoples’ boats, I’m looking for those unusual shooting angles as the boats sail around me.  I try to anticipate what boat and helmsperson might do on different reaches and tacks and also look for those unscripted interactions between helmsperson and boat which show their sheer joy in sailing their own boat. Some images of crew intently engaged in ‘action’ such as raising a sail, commencing a tack or furling a jib capture ‘movement’ that conveys the sense of a boat being ‘under way’. My previous post gives further ideas.

And lastly, a plea about safety (tip 3). Even in an anchored boat, it’s one hand for yourself and one hand for the boat. Keep your camera on a short neck strap so, if need be, you can quickly let it go to use two hands for safety. Try to shoot from a seated position so there is less chance of slipping or being a MOB casualty and wear appropriate grippy footwear, deck shoes or yacht boots.  With suitable clothing and sunscreen for the day easy to hand, always wear your life jacket or PFD as well.

I hope across the two blog posts you now have all that you need to help you go out there and get some really good photographs of your dinghy and of those belonging to other dinghy cruisers. Don’t be shy, if you think they are ‘good’ shots, then enter them for the Dinghy Cruising Association photography competition. Details on the DCA website, given at the start of this blog post.

Good luck now, fair winds and see you out on the water.


How can I get ‘good’ photographs of my boat and other boats sailing on the water?

The recent announcement about a DCA photograph/video/artwork annual competition is a great idea. Perpetually frustrated at not being able to get any decent photos of my boat (or any other boat for that matter) anchored, sailing or sitting on a beach or driveway, this competition now provides the impetus to me getting out there and do something about the situation.


Many of us carry a camera of some form on our dinghies and a quick trawl of social media shows there are many dinghy cruisers posting pictures to Facebook, Instagram, TikToc and YouTube.  Some of those photos are truly stunning........

 “A cruising dinghy under full sail, the skipper leaning on his coaming, gazing up intently at his well-set sails, whilst the small boat’s bow lifts across the wave tops, splashed water frozen in minute detail against a sharply defined background of boat hull, blue skies, tan sail and verdant green creek side reed beds.”

 I long for some similar pictures of ‘Arwen’ and any ability/skill to take such pictures for other dinghy cruisers. This new annual DCA award for the best photograph (and video/artwork) has thus set me thinking:

·        What makes for a ‘good’ dinghy cruising photo’?

·        How can I judge how ‘good’ my dinghy cruising related photos are?  

·        What kind of subjects might I consider photographing that are dinghy cruising related and how could I plan to successfully achieve such photos?

I have two other questions (see below) and I’ve attempted to explore these in another blog if you are interested – it follows on from this post.

·        What equipment can I use to get a ‘pleasing’ dinghy cruising related photograph?

·        What basic photographic skills would I need to develop in order to obtain this photo?


If you are interested in entering the competition then you can go to this page here on the DCA website  

https://www.dinghycruising.org.uk/photo-competition.html  and if you want to download a PDF of this blog post visit 

https://www.dinghycruising.org.uk/uploads/7/6/9/7/76979649/about_good_photography_steve_parke.pdf


So, without further ado, lets jump straight in by exploring

Why the DCA should have a competition at all? 

On a recent ‘beginners’ digital photography course, the tutor impressed upon us all that “getting a good photograph is all about the interplay of subject matter, timing, composition and light” and that with a little knowledge and planning, this can be achieved by beginners on a variety of cameras - smartphone, compact camera, DSLR, Bridge camera and yes, even an action cam. He also stressed the other ingredient is some thinking! ‘Why do we want photographs of our boats and other aspects of dinghy cruising?’

An interesting question – a competition will give more great source material for the DCA journal and website. But it’s obviously more than just that. Great dinghy cruising adventures are often made by the people sailing with us, the stunning scenery and variable conditions we sail through, the skills we develop and how we grow individually and collectively as a result of the voyage. A well composed photograph tells the viewer a storypeople, places, events, weather, dinghy design and craftsmanship – a collection of images with a variety of subject matter, lighting and composition building up a great visual travelogue and cruise record of our adventures which we can then share with family, friends and the wider dinghy cruising community. We can also glean lots from good photos (a picture paints a thousand words and all that); I defy anyone not to learn something from a photo or video – either appreciation of a new skill, a sudden idea, or just as importantly, how not to do something!) Most importantly, good photos provide an opportunity to celebrate and promote the benefits and joys of dinghy cruising to the wider world.  


Figure 1 shows the DCA annual competition categories:

Figure 1 - Three DCA competitions:

1.        Photography  - three categories  with all entries in high resolution format, at least 2MB:

a.        Cruising – the things that mark a boat out as a dinghy that cruises

b.        Amusing – Make us all smile

c.         Inspiring – The ‘Wow’ factor (whatever you think would make viewers go ‘wow’ on first seeing your photo)

2.        Video – All entries to be either 1080p, 2.7K or 4K max, preferably shot in landscape mode and a maximum of 40 minutes in length. No categories for this competition – so anything from an inspiring shot of dolphins at the bow, to technical ‘how to’ or narrative cruising logs.

3.        Artwork – Quick pencil/pen sketches and lovely watercolours, photos of beach art alongside your dinghy or pyrography designs on your boat, this is a wide-ranging category.


These categories are sufficiently broad enough for our individual interpretation.

Tricky question now, should the competition have any rules? If, like me you have a natural allergy to long lists of rules, I will tentatively suggest three:

1.       Up to 10 entries from any one individual in each of as many categories as they wish

2.       Each entry to be accompanied by a caption and brief location/explanatory details, if appropriate

3.       Minimal digital manipulation that superficially enhances an image without altering it in any major way

Perhaps it’s time to move smartly onto potentially less controversial territory then, by exploring the first main question:


What makes for a ‘good’ dinghy cruising photo?

Aspiring to take better dinghy cruising photographs, I’ve been thinking about what getting a ‘good’ photograph might entail. My definition of ‘good’ is simple – a photo that has qualities above that of my ‘average’ boat photo. It’s one I’d happily use in social media, publications or printed off for the wall; or one that provides lots of pleasure to me when viewing it; or even just one that survives my immediate ‘keep or cull’ review after taking it.

Figure 2 tries to tease out my ‘good’ photo thinking a little more and you might use this to judge to what extent you think the photos accompanying this post are 'good'?

Figure 2: How do I judge whether a photograph relating to any aspect of my dinghy cruising is ‘good’ enough to keep and/or print/publish?

‘Good’ is an above average boat photo which achieves just a few of the following for me:

1.        ‘Emotional impact’ – provokes an immediate emotion for me/ a viewer – ‘wow’, joy, incredulity, pride, curiosity, fun, excitement, intrigue, inspiration, sense of adventure, comradeship, awe, terror etc. Pick your emotion.

2.        ‘Some photographic ‘technical’ skill’ – my photo is sharp, correctly focussed, generally well exposed. It tries to make good use of light and displays sharp depth of field or bokeh blurred backgrounds. I’ve achieved basic framing and horizon setting. My photo shows some compositional understanding – helped by my use of the ‘rule of thirds’ to position key elements; or it has a good balance between foreground, midground and background. My photo draws in the viewers eye to a key point and encourages it wonder elsewhere.

3.        ‘Some originality/creativity’ – It’s taken from an unusual viewpoint or perspective; may have an unusual choice of subject matter or focal points within the scene or even an interesting use of light and/or colour and shapes, textures and patterns.

4.        ‘Tells a story’for me this is the important one - my photo evokes a viewer’s imagination, tells a story about dinghy cruising (the boat, the crew, the locations sailed, equipment used/made, craftsmanship etc). Composition conveys a message e.g. emotional impact or it might capture a unique moment in time like some special lighting on the boat/location/people. An atmosphere or buzz, an expression of your crew, a seasonal landscape focus e.g. a beached dinghy on a winter beach with a snowy background. 

5.        ‘How successfully it promotes and celebrates all aspects of dinghy cruising’  


What criteria could I use to judge how ‘good’ my dinghy cruising related photos are? 

This is an ‘elephant in the room’ question which may or may not generate some discussion!

I feel that any competition needs some clear, simple, transparent, regularly published ‘judging’ criteria for potential competition entrants and judges. The criteria illustrate what the competition is trying to achieve. In this particular competition context, it will help me reflect on how I take photos before submitting them. This competition is, after all, about ‘celebrating excellence and promoting dinghy cruising to a wider world through the journal and website’.

Figure 2 above is, I think, a start towards these criteria. Simplified to ‘headings’ - photos/videos/artwork could be judged on ‘emotional impact’, ‘technical skill’, ‘originality/creativity’, ‘storytelling’ and ‘promotion and celebration of all aspects of dinghy cruising’. All we have to say to ourselves is ‘does my photo fulfil some of these criteria?’ If the answer is yes – we enter it. If the answer is no, we can, if we want to, still enter it or we can work out why it didnt answer this initial question and correct this. The DCA competitions are for fun - to celebrate what we do when dinghy cruising – but they are also an opportunity for us all to learn more from doing the photos and from the submitted entries. The more visually appealing and interesting the photos, the more we may learn from them?

If you are sitting there now spitting out your coffee in indignation …. ‘RULES? CATEGORIES? JUDGING CRITERIA?  - how dare he …. doesn’t he appreciate the ‘non-conformist’ philosophy of this association - outrageous suggestions’ – I sincerely apologise and hopefully I can redeem myself in this last section:

What kind of subjects might I consider photographing that are dinghy cruising related and how could I plan to successfully achieve such photos?

I’ll start by returning to the topic of ‘composition’. Many people do fantastic photographs on the spur of the moment. Lucky souls! I am so envious of you if you are one of these people. How do you manage it? Some do the ‘spray and pray’ method – taking hundreds, chancing that some will turn out brilliant. My approach! It works! Sometimes! The trawl through the hundred I took to find just the two outstanding ones, is however frustrating and time consuming.

People who consistently deliver ‘good’ photos do so because they think about the shot they are about to take and they practice. I have complete admiration for these individuals. They understand the importance of ‘composition’, how it is fundamentally the most important aspect in photographing bodies of water, boats and seascapes. They see, select and order what is compelling and purposeful; they visualise how the elements in a picture fit together - what is important to the scene and what isn’t; what makes a good ‘lead-in’ foreground into the rest of the picture.

Now admittedly, thinking about composition is far easier to do when onshore where the ground is fairly stable! Its trickier, when on a boat with one hand on the tiller and the horizon rising and falling a metre or more every few seconds! However, I have been learning some simple ‘composition’ tricks recently and now consciously think about at least one of them before I push the shutter button, even when in the boat. Figure 3 below has some thoughts about composition which I hope might help you.


Figure 3 Some thoughts about photo composition:

A well composed photo positions its key elements and lighting to tell a story about the boat, it’s crew or the sailing scenery. Your eye is drawn from an interesting foreground to a main focal point. To achieve this, try these tips:

·        Switch on the 3 x 3 rectangles ‘rule of third’s’ grid  on your rear screen and viewfinder. It is an easy way of creating a balanced and visually interesting picture. The grid breaks the image into thirds - vertically and horizontally - with imaginary gridlines. Horizons are placed close to either the top or lower horizontal line, masts aligned on one of the two vertical lines and objects of interest located on one of the four intersection points between vertical and horizontal lines. This makes for visually more interesting pictures.  A boat on the water would be best placed 1/3rd of the way across the frame – sailing into the rest of the frame space. Or you can just go for simplicity in composition – choose just three elements to put into your photo – a minimalist approach e.g. boat hull, watery reflection, bow line.

·        Find an interesting foreground as a visual stepping stone into the rest of your picture e.g. a rock pool with a reflection and your boat dried out on the beach behind. The foreground draws the viewer’s eye in and then the eye explores the rest of the scene beyond. Obviously, the foreground should be relevant to dinghy cruising in some way.

·        Direct the viewer’s eye by using lead in lines – a strong linear element such as a fence, a rock, a wall, a road, the curve of a quayside wall – place it so it begins in the bottom third of your photo in the left or right corner and position it so it leads towards the middle where the main object of your photo is – your boat!

·        Use natural objects on a beach to act as a frame within a frame e.g. your boat is framed between the branches of a driftwood branch on the strand line; or between two upright rocks – you get the idea. If doing this – shoot from low down – stabilise your camera on your rucksack or bag.

·        Isolate your main focus point from the background by using a long zoom lens or compact zoom and apertures of F/2.8 to F/4. On most DSLR’s and compact cameras you can select ‘aperture priority mode’, set this aperture and the camera will work out all the other settings for you. Want the background in sharp focus as well? Then choose apertures around F/8 – 11.

·        Assess whether you have balanced the amount of water, boat and sky in the image before pressing the shutter - try to include lots of ‘air space’ around the boat for later post edit cropping. ‘Tight cropping’ on the boat will lead to distortion of hull shape.

·        Check you haven’t cut off  - part of the bowsprit; hidden the helmsperson behind the boom; got something dangling over someone’s head etc.

·        Getting all of the mast in shot is notoriously difficult so chill - aim to get just enough in the image so that a viewer can work out what the sail rig is.

·        Wonky horizons distract a viewer, drawing their gaze away from the boat, so check it is straight.

·        In the main, shoot in landscape mode. However, if shooting for a magazine cover, contact the editor beforehand to see if they would prefer photos in portrait mode – which might better suit a magazine cover.

·        Go for a different perspective – shooting low allows your dinghy to look larger, more imposing and more majestic – seriously – try it!

·        (Make sure any landscape shots are in focus from foreground to background – focus on a point about a 1/3rd of the distance to the horizon and you should have most of the scene from foreground to background in focus.)

I’m at the point where I can almost hear some people saying ‘if I wanted to learn photography, I’d buy a photography magazine!’ but I’m hoping that those of you, interested in taking better photographs of seascapes, boats and all things dinghy cruising, are beginning to feel inspired to have a go at the DCA competition. This next bit will hopefully, provide you with some further ideas, tips and inspiration.

Tip onepre-plan your photographs - it will significantly increase your chances of obtaining high quality, compositionally stunning images commensurate with your skill level. What is the essential essence/aspect of my boat I want to capture? What other situation/subject do I want conveyed in images?  Am I going for ‘mood’ or ‘action’? What is my audience and purpose for the photo – wall print, magazine, social media account?

 Tip two - seek inspiration for ‘good’ dinghy/boat photos by exploring Instagram, Facebook, Pinterest and various sailing journalism websites.

Tip three - Photography is about light and the best time to photograph is ‘golden hour’ - the couple of hours after sunrise or before sunset - when winds are less, watery boat reflections more sharply defined and nature’s colour balance warmer and softer. Golden hour lighting illuminates the deeper recesses of a dinghy’s hull. If shooting people during these hours, shoot them facing to the sun to get the light on their faces. If they are backlit, make sure you expose the picture for the sky not their faces. On a smartphone and some compact cameras, switch on HDR mode (High dynamic range) as it will take three identical images but with different exposure settings and then blend them together so that highlights, midtones and shadows are all correctly exposed.  As the sun climbs towards midday, its overhead position gives harsher, colder light and contrasty shadows in my images that hide the finer details of Arwen’s cockpit interior i.e. all the scratches, dings, scrapes etc.  At such times, I should switch on ‘flash infill’ to better illuminate the shadowy areas. (Embarrassment at Arwen’s interior state prevents me from doing so by the way!)  Obviously, if I’m seeking ‘spray over deck’ shots taken from the rear of Arwen’s cockpit, then I go when tide, wind and wave conditions are best for this; and this may be during the day and not in ‘golden hour’. So be it!

Tip four – if you are photographing your boat, under way, dried out on a beach or tied to a pontoon, clear away loose lines, stow fenders and loose gear, trim lines, fill sails (says the man whose has a permanent throat to clew crease whenever he sails). Neatness and seamanship counts. Untidy details distract the viewer’s eye.

Tip fiveit’s all about the shooting angles! Shooting another boat on the water? Photograph it from astern – over the transom stern quarter area as the boat rises up on a wave and you get the whole boat length in your photo. On a collision course with an approaching bow is dramatic! A photo taken whilst the focal point boat is on a beam reach can give great views of decks, crew, helmsperson, sails and rigging. A boat shot from its windward side shows more hull but less cockpit interior. Shooting from the leeward side shows more of the boat’s lines and interior cockpit action. Vertical portrait shots show more of the mast and rigging but try to do it when there are interesting cloud formations in the sky as a backdrop.


Tip sixgo for the sense of ‘dramatic’! Bow splashes, spray over foredeck or the helmsperson peering from under a sail. For splashes (and dolphins for that matter), use a shutter speed between 1/250th and 1/500th of a second to sharply ‘freeze’ the spray. ‘Sports’ or ‘burst’ mode on your camera, if you have it, will do this for you. Afterwards quickly review the image sequence and delete those that don’t look good – it’s a good housekeeping habit which pays off at editing time. If you are shooting a dinghy sailing close past really dramatic coastal scenery then use a telephoto lens or zoom with a compact camera to emphasis the scale of the boat against that background.

Tip seven -  make a close-up ‘details story-telling’ list – and over a period of dinghy cruising trips shoot the photos you want e.g. water droplets on a finely varnished piece of woodwork (not that there is any of that in Arwen, poor thing); seaweed wrapped around a moused shackle between muddy anchor and chain; the folds of sail draped over your boom; the curve of your bow as it meets its reflection in calm waters whilst at anchor; driftwood on the beach, beads of condensation on that ice cold beer you saved for after you’ve rigged the boom tent; the mooring ring or cleat you tie up to; a jib block on your side deck; the fall of a well coiled mooring rope. I try to think ‘BIG picture- little picture’ for a shot’s list. GoPro’s by the way are great for close ups – be 30 cm away from the object.

Tip eightgo for uncluttered backgrounds if you want to show your dinghy at its best.  Marinas, tall shoreline buildings, other background sailing boats - visually confuse a viewer and distract their eye away from the main subject, your cruising dinghy. If shooting whilst onshore, crop out clutter by using a tripod (or resting the camera on your rucksack) and a longer telephoto lens to zoom closer to your dinghy. The tripod/bag stability also gives better, longer exposures in lower light conditions.

Tip nine – if you have it on your camera, switch on image stabilisation, especially if taking photos whilst in your boat on the sea and if you can, use your body as a shock absorber to reduce the ‘bobbing’ motion transferring to your camera.

Tip ten - taking photos of other people’s dinghies from your anchored boat in a safe, calm area increases the chances of getting a really good photo no end. The other skipper can helm his/her dinghy closely around your boat and between you, you can work out the best approach angles and distances from your anchored dinghy to ensure the shots you get are best.  

Tip elevenget plenty of photographs of people enjoying dinghy cruising activities whether it be launching, actively sailing, erecting boat tents, scratching their heads whilst poring over charts, cooking on stoves or washing up the pots and pans afterwards. Aim for faces rather than the backs of heads. Try to capture the emotion – joy, puzzlement, intense concentration, laughter! No halyards, no shrouds, no masts growing out of their heads! If sailing crews are ‘busy’ and ‘active’ in the dinghy, then use high shutter speeds of 1/200th plus to ‘freeze the action (or use that ‘sports/burst’ mode to take a rapid sequence of shots.) People under a boom tent at night or sat out on a beach as dusk descends requires a higher ISO or ‘dawn/dusk/night’ setting to avoid the need for flash and ‘red eye’ syndrome. Wide angle lens settings, 18 – 35mm lenses or zooms, are great for group shots and remember people don’t have to be looking at you. However, if they are doing anything active, make sure you include their hands within the shot so that a viewer can see what is being done.

Tip twelveduring golden hour (sunrise and sunset) winds tend to die down giving still, flat water, perfect for those watery reflections of hulls and scenery.

Tip thirteengo for colour! White hulled dinghy, blue skies and grey seas look great but, add a splash of colour, and the scene really comes alive. Look for those tan sails, the yellow foulies, the bright red PFD. Any colour that jars the viewer’s eye can be a good thing.

Tip fourteenown a GoPro? Go for an early evening swim around your anchored dinghy and use the GoPro to take images of the boat from the water level.  Try for a low-level shot with the coastline in the background during golden hour if it isn’t too chilly by then. (You can buy a dome for your GoPro which allows you to take one of those overwater/underwater split shots where you get to see above the waterline and the keel and hull below the water. Impossible to do this shot without the dome by the way! Go on, ask me how I know!)

Tip fifteen‘look into the light’ – backlit silhouette shadows of the crew through the white sails and rippled clear reflections of the boat in mirror calm seas – stunning images. And remember, the angle your light comes from can really play a part in creating a great photo. The more acute the angle of the sunlight hitting an object, the better the emphasis on the object’s texture and shape.


Tip sixteenall those construction projects – that pile of shavings alongside a shapely oval profile boom; the clamps holding three sides of a materialising ‘galley box’; the intense concentration on the face of your 8-year-old as she/he handles a drill for the first time whilst working on the hull of your new dinghy; the empty mug alongside a dinghy construction blueprint, a pad of scribbled notes and the pencil? The pile of ‘frames’ cut out and ready to erect. Those photos? They are all to do with dinghy cruising! They all tell a great story! They all promote and celebrate dinghy cruising.

Tip seventeenthose dinghy drying out locations - dried out in a big sandy bay? Try to get a little height to ‘shoot’ down onto the boat, setting it within the context of the enormity of the beach/bay. More dramatic! In any drying out location, shoot from the side, trying to get foreground interest such as a tidal pool with sky reflections or ripple textured patterns on the sand in front of the boat hull. Is there a leading line opportunity like along the anchor rode and chain to the boat, taken of course, from a low-down perspective? Go for 1/3rd sky, 2/3rds foreground and boat. What’s the view like out the back of your boom tent – can you get the stove, your hand stirring the pot and a great view of your drying out location out back all in one shot? Or how about your cockpit interior under the boom tent with sleeping platforms sorted? Finally, I’d argue there is a story to each of your drying out locations – a close up of the rocks, the cliff geology (keep safe though!) – geology texture, colour patterns, strata. In shots like this exclude the sky, focus on the rocks. Sometimes it pays to stand back and use a zoom lens to close in on the rocks.  Beach patterns and features are equally interesting – the meandering stream, the ripple sand marks, footprints towards your dinghy, reflections in a patch of wet sand. Rockpools provide great foreground interest because they reflect the sky patterns; or they are fringed by brilliantly coloured seaweeds. Sand dunes with marram grass give great foreground interest with your dried out boat behind. Cliff tops give a good overview of the coastline you have sailed.

I hope you have gained some ‘food for thought’, some inspiration and a desire to enter the DCA annual photograph/video/artwork competition this year. Remember, irrespective of whatever your subject content/elements are …… the absolute key to a ‘good’ photo is all about figures 2 and 3. Does your photo tell a story/show any of the following?

  • ·        emotional impact,
  • ·        some illustration of technical skills,  
  • ·        some originality/creativity,
  • ·        great storytelling,
  • ·        the promotion and celebration of any aspect of dinghy cruising,
  • ·        and, finally last but no means least, an interesting composition.

www.arwensmeanderings.blogspot.co.uk – in search bar type ‘taking good dinghy cruising photos’

http://logofspartina.blogspot.com/