The recent announcement about a DCA photograph/video/artwork annual competition is a great idea. Perpetually frustrated at not being able to get any decent photos of my boat (or any other boat for that matter) anchored, sailing or sitting on a beach or driveway, this competition now provides the impetus to me getting out there and do something about the situation.

Many of us
carry a camera of some form on our dinghies and a quick trawl of social media
shows there are many dinghy cruisers posting pictures to Facebook, Instagram,
TikToc and YouTube. Some of those photos
are truly stunning........
“A cruising dinghy
under full sail, the skipper leaning on his coaming, gazing up intently at his
well-set sails, whilst the small boat’s bow lifts across the wave tops,
splashed water frozen in minute detail against a sharply defined background of
boat hull, blue skies, tan sail and verdant green creek side reed beds.”
I long for some similar pictures of ‘Arwen’
and any ability/skill to take such pictures for other dinghy cruisers. This new annual DCA award for the best photograph (and
video/artwork) has thus set me thinking:
·
What makes for a ‘good’ dinghy cruising photo’?
·
How can I judge how ‘good’ my dinghy cruising related photos are?
I have two other questions (see
below) and I’ve attempted to explore
these in another blog if you are interested – it follows on from this post.
·
What equipment can I use to get a ‘pleasing’ dinghy cruising related
photograph?
·
What basic photographic skills would I need to develop in order to obtain
this photo?

If you are interested in entering the competition then you can go to this page here on the DCA website
https://www.dinghycruising.org.uk/photo-competition.html and if you want to download a PDF of this blog post visit
https://www.dinghycruising.org.uk/uploads/7/6/9/7/76979649/about_good_photography_steve_parke.pdf
So, without further ado, lets jump
straight in by exploring
Why the DCA should have a competition
at all?
On a recent ‘beginners’
digital photography course, the tutor impressed upon us all that “getting a
good photograph is all about the interplay of subject matter, timing,
composition and light” and that with a little knowledge and planning, this
can be achieved by beginners on a variety of cameras - smartphone, compact
camera, DSLR, Bridge camera and yes, even an action cam. He also stressed the
other ingredient is some thinking! ‘Why do we want photographs of our boats
and other aspects of dinghy cruising?’
An
interesting question – a competition will give more great source material for
the DCA journal and website. But it’s obviously more than just that. Great
dinghy cruising adventures are often made by the people sailing with us, the
stunning scenery and variable conditions we sail through, the skills we develop
and how we grow individually and collectively as a result of the voyage. A
well composed photograph tells the viewer a story – people, places,
events, weather, dinghy design and craftsmanship – a collection of images
with a variety of subject matter, lighting and composition building up a great
visual travelogue and cruise record of our adventures which we can then share
with family, friends and the wider dinghy cruising community. We can also glean
lots from good photos (a picture paints a thousand words and all that); I defy
anyone not to learn something from a photo or video – either appreciation of a new
skill, a sudden idea, or just as importantly, how not to do something!) Most
importantly, good photos provide an opportunity to celebrate and promote
the benefits and joys of dinghy cruising to the wider world.
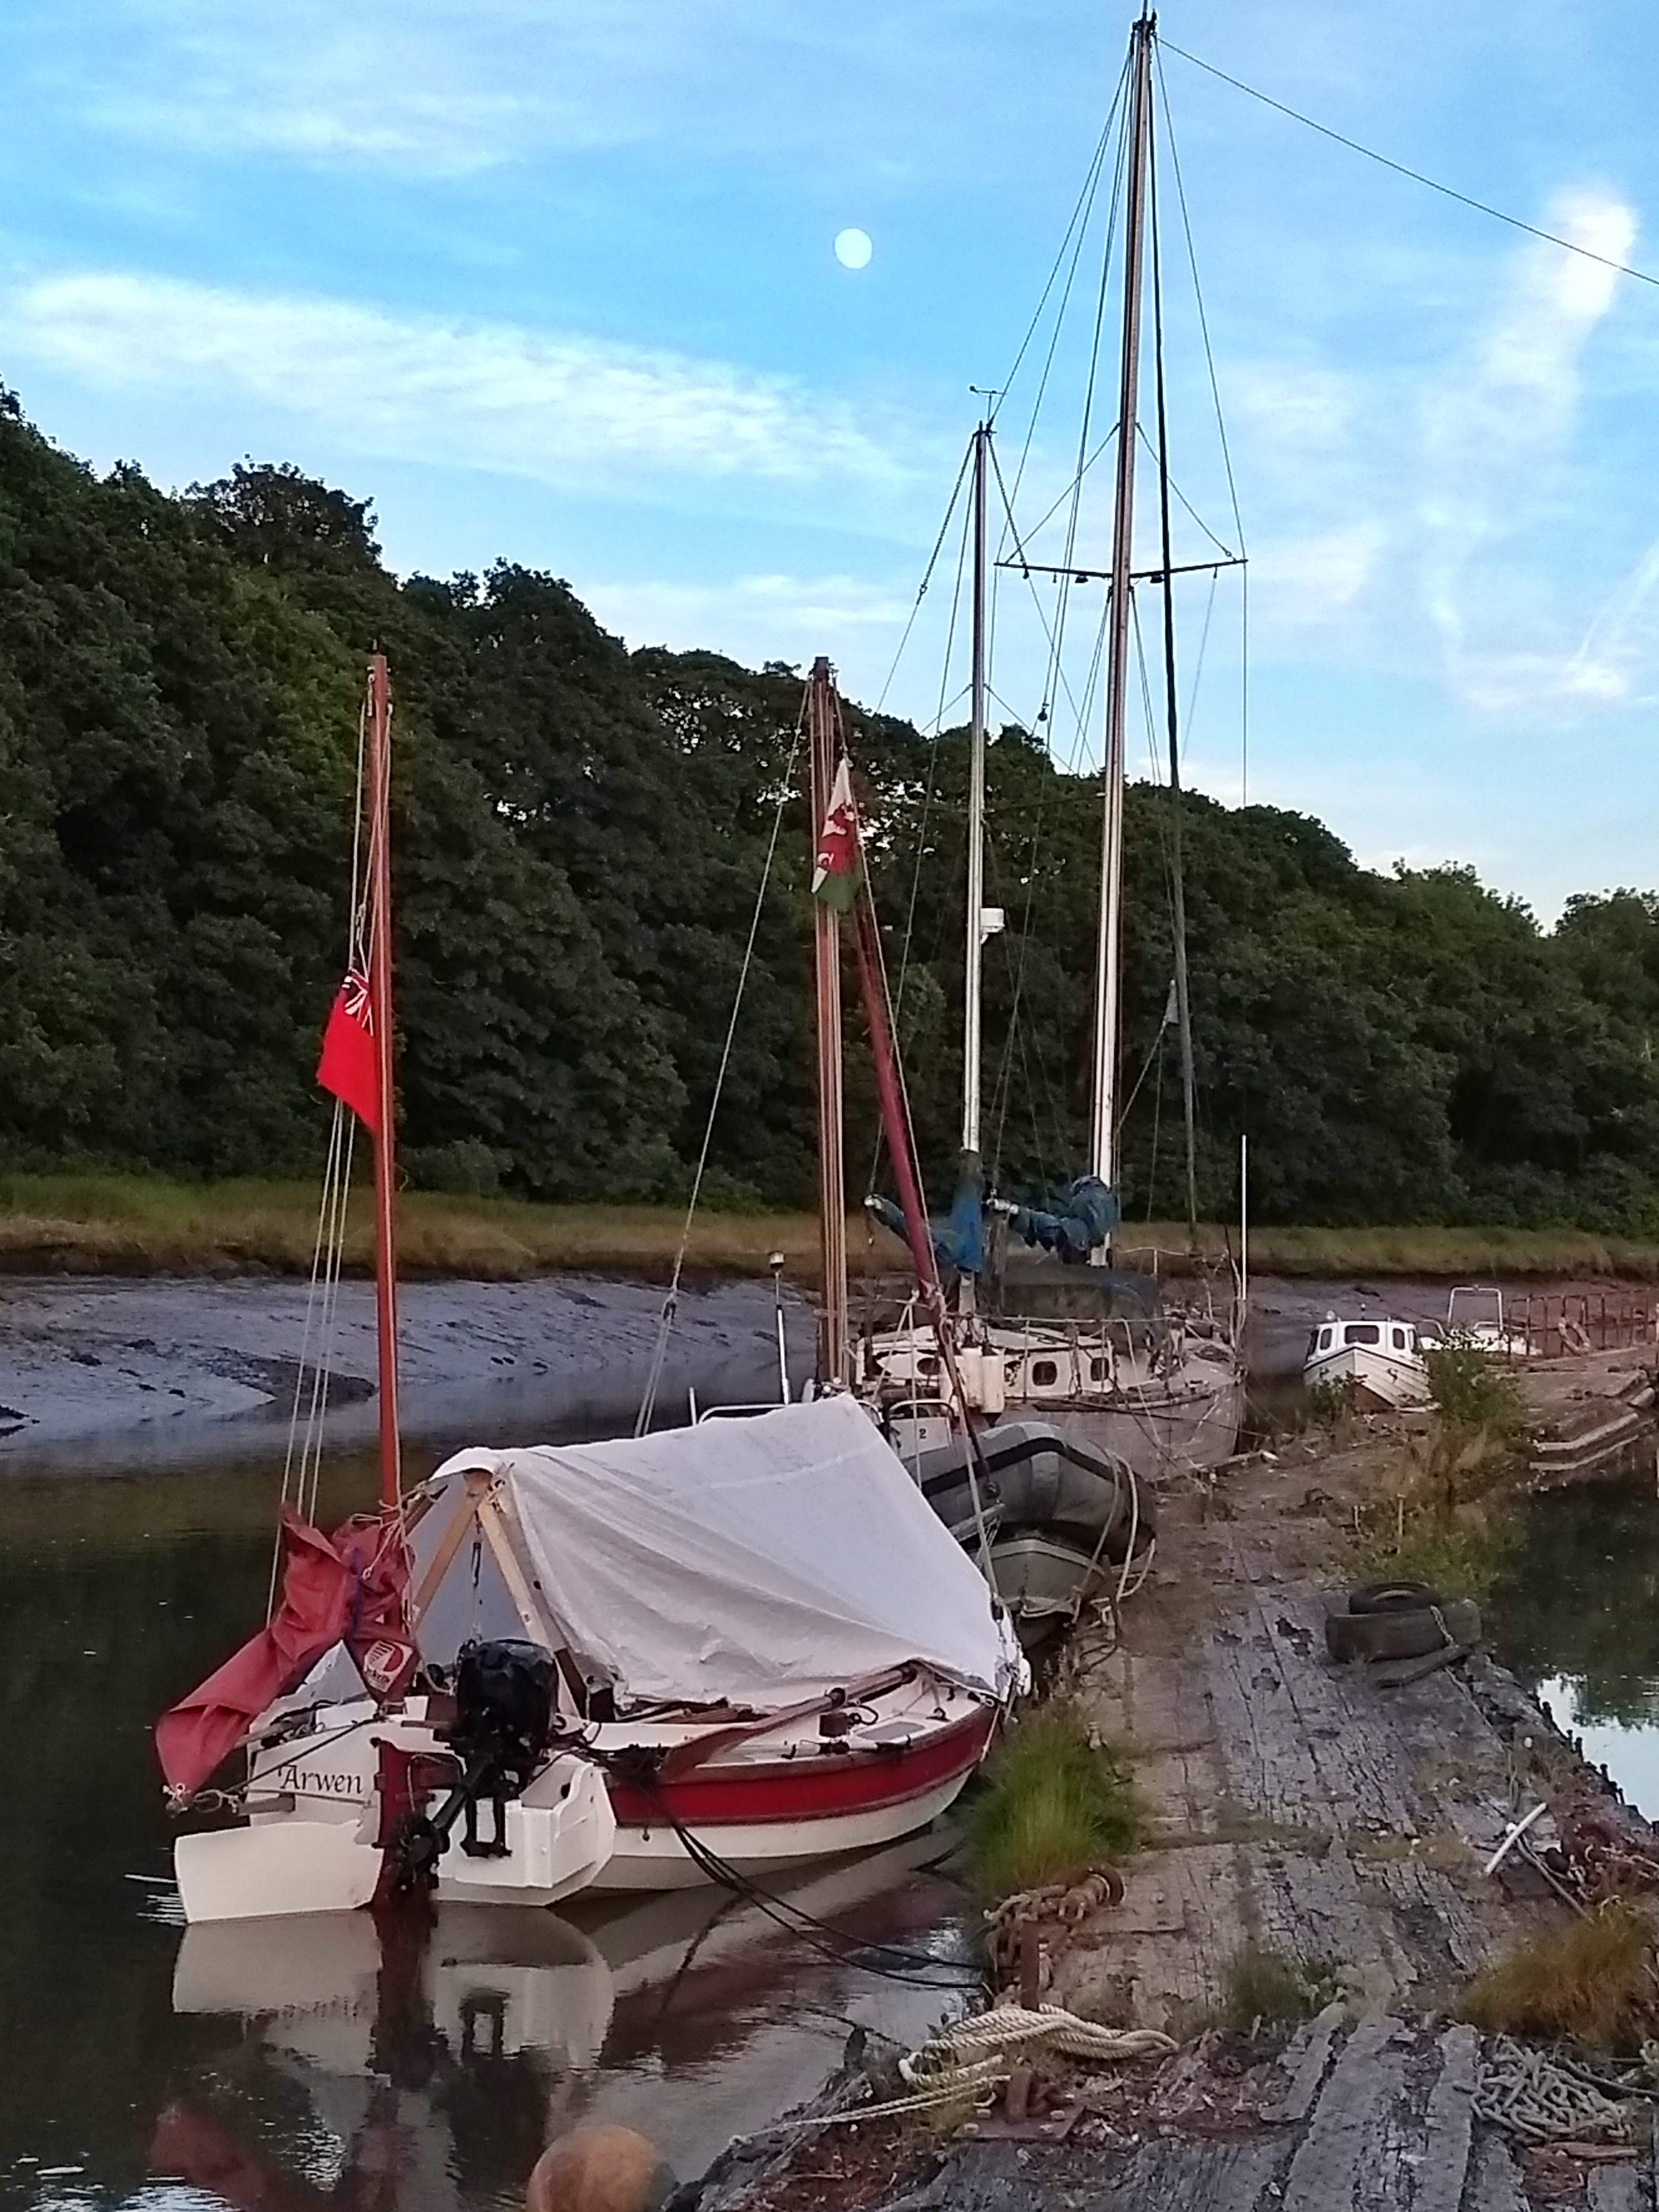
Figure 1
shows the DCA annual competition categories:
Figure 1 -
Three DCA competitions:
1.
Photography - three categories with all entries in high resolution format,
at least 2MB:
a.
Cruising – the
things that mark a boat out as a dinghy that cruises
b.
Amusing – Make
us all smile
c. Inspiring – The ‘Wow’ factor (whatever you think would make viewers go ‘wow’ on first seeing your photo)
2. Video – All entries to be either 1080p, 2.7K or 4K max, preferably shot in landscape mode and a maximum of 40 minutes in length. No categories for this competition – so anything from an inspiring shot of dolphins at the bow, to technical ‘how to’ or narrative cruising logs.
3.
Artwork – Quick
pencil/pen sketches and lovely watercolours, photos of beach art alongside your
dinghy or pyrography designs on your boat, this is a wide-ranging category.
These
categories are sufficiently broad enough for our individual interpretation.
Tricky
question now, should the competition have any rules? If, like me you have a
natural allergy to long lists of rules, I will tentatively suggest three:
1. Up to 10 entries from any one
individual in each of as many categories as they wish
2. Each entry to be accompanied by a
caption and brief location/explanatory details, if appropriate
3. Minimal digital manipulation that
superficially enhances an image without altering it in any major way
Perhaps it’s
time to move smartly onto potentially less controversial territory then, by
exploring the first main question:
What
makes for a ‘good’ dinghy cruising photo?
Aspiring to
take better dinghy cruising photographs, I’ve been thinking about what getting
a ‘good’ photograph might entail. My definition of ‘good’ is simple – a photo
that has qualities above that of my ‘average’ boat photo. It’s one I’d happily
use in social media, publications or printed off for the wall; or one that
provides lots of pleasure to me when viewing it; or even just one that survives
my immediate ‘keep or cull’ review after taking it.
Figure 2
tries to tease out my ‘good’ photo thinking a little more and you might use this to judge to what extent you think the photos accompanying this post are 'good'?
Figure 2: How
do I judge whether a photograph relating to any aspect of my dinghy cruising is
‘good’ enough to keep and/or print/publish?
‘Good’ is an above average boat photo which achieves
just a few of the following for me:
1.
‘Emotional impact’ – provokes an immediate emotion for me/ a viewer – ‘wow’, joy,
incredulity, pride, curiosity, fun, excitement, intrigue, inspiration, sense of
adventure, comradeship, awe, terror etc. Pick your emotion.
2.
‘Some photographic ‘technical’ skill’ – my photo is sharp, correctly focussed, generally well
exposed. It tries to make good use of light and displays sharp depth of field
or bokeh blurred backgrounds. I’ve achieved basic framing and horizon setting.
My photo shows some compositional understanding – helped by my use of the
‘rule of thirds’ to position key elements; or it has a good balance between
foreground, midground and background. My photo draws in the viewers eye to a
key point and encourages it wonder elsewhere.
3.
‘Some originality/creativity’ – It’s taken from an unusual viewpoint or perspective; may
have an unusual choice of subject matter or focal points within the scene or
even an interesting use of light and/or colour and shapes, textures and
patterns.
4.
‘Tells a story’ – for me this is the important one - my photo
evokes a viewer’s imagination, tells a story about dinghy cruising (the boat,
the crew, the locations sailed, equipment used/made, craftsmanship etc). Composition
conveys a message e.g. emotional impact or it might capture a unique moment in
time like some special lighting on the boat/location/people. An atmosphere or
buzz, an expression of your crew, a seasonal landscape focus e.g. a beached
dinghy on a winter beach with a snowy background.
5.
‘How successfully it promotes and celebrates all aspects of
dinghy cruising’

What
criteria could I use to judge how ‘good’ my dinghy cruising related photos
are?
This is an ‘elephant
in the room’ question which may or may not generate some discussion!
I feel that any
competition needs some clear, simple, transparent, regularly published
‘judging’ criteria for potential competition entrants and judges. The criteria
illustrate what the competition is trying to achieve. In this particular competition
context, it will help me reflect on how I take photos before submitting them.
This competition is, after all, about ‘celebrating excellence and promoting
dinghy cruising to a wider world through the journal and website’.
Figure 2
above is, I think, a start towards these criteria. Simplified to ‘headings’ -
photos/videos/artwork could be judged on ‘emotional impact’, ‘technical
skill’, ‘originality/creativity’, ‘storytelling’ and ‘promotion and celebration
of all aspects of dinghy cruising’. All we have to say to ourselves is ‘does
my photo fulfil some of these criteria?’ If the answer is yes – we enter
it. If the answer is no, we can, if we want to, still enter it or we can work
out why it didnt answer this initial question and correct this. The DCA
competitions are for fun - to celebrate what we do when dinghy cruising –
but they are also an opportunity for us all to learn more from doing the photos
and from the submitted entries. The more visually appealing and interesting the
photos, the more we may learn from them?
If you are
sitting there now spitting out your coffee in indignation …. ‘RULES?
CATEGORIES? JUDGING CRITERIA? - how dare
he …. doesn’t he appreciate the ‘non-conformist’ philosophy of this association
- outrageous suggestions’ – I sincerely apologise and hopefully I can
redeem myself in this last section:
What
kind of subjects might I consider photographing that are dinghy cruising
related and how could I plan to successfully achieve such photos?
I’ll start
by returning to the topic of ‘composition’. Many people do fantastic photographs on the spur of
the moment. Lucky souls! I am so envious of you if you are one of these people.
How do you manage it? Some do the ‘spray and pray’ method – taking hundreds,
chancing that some will turn out brilliant. My approach! It works! Sometimes!
The trawl through the hundred I took to find just the two outstanding ones, is
however frustrating and time consuming.
People who
consistently deliver ‘good’ photos do so because they think about the shot
they are about to take and they practice. I have complete admiration for
these individuals. They understand the importance of ‘composition’, how it
is fundamentally the most important aspect in photographing bodies of water,
boats and seascapes. They see, select and order what is compelling and
purposeful; they visualise how the elements in a picture fit together - what is
important to the scene and what isn’t; what makes a good ‘lead-in’ foreground
into the rest of the picture.
Now
admittedly, thinking about composition is far easier to do when onshore where
the ground is fairly stable! Its trickier, when on a boat with one hand on the
tiller and the horizon rising and falling a metre or more every few seconds!
However, I have been learning some simple ‘composition’ tricks recently and now
consciously think about at least one of them before I push the shutter button,
even when in the boat. Figure 3 below has some thoughts about composition
which I hope might help you.

Figure 3 Some
thoughts about photo composition:
A well
composed photo positions its key elements and lighting to tell a story about
the boat, it’s crew or the sailing scenery. Your eye is drawn from an interesting foreground to a
main focal point. To achieve this, try these tips:
·
Switch on the 3 x 3 rectangles ‘rule of third’s’ grid on your rear screen and viewfinder. It is an
easy way of creating a balanced and visually interesting picture. The grid
breaks the image into thirds - vertically and horizontally - with imaginary
gridlines. Horizons are placed close to either the top or lower horizontal
line, masts aligned on one of the two vertical lines and objects of interest
located on one of the four intersection points between vertical and horizontal
lines. This makes for visually more interesting pictures. A boat on the water would be best placed
1/3rd of the way across the frame – sailing into the rest of the frame space.
Or you can just go for simplicity in composition – choose just three elements
to put into your photo – a minimalist approach e.g. boat hull, watery
reflection, bow line.
·
Find an interesting foreground as a visual stepping stone into the rest of your picture
e.g. a rock pool with a reflection and your boat dried out on the beach behind.
The foreground draws the viewer’s eye in and then the eye explores the rest of
the scene beyond. Obviously, the foreground should be relevant to dinghy
cruising in some way.
·
Direct the viewer’s eye by using lead in lines – a strong linear element such as a
fence, a rock, a wall, a road, the curve of a quayside wall – place it so it
begins in the bottom third of your photo in the left or right corner and
position it so it leads towards the middle where the main object of your photo
is – your boat!
·
Use natural objects on a beach to act as a frame within a frame e.g. your boat is framed
between the branches of a driftwood branch on the strand line; or between two
upright rocks – you get the idea. If doing this – shoot from low down –
stabilise your camera on your rucksack or bag.
·
Isolate your main focus point from the background by using a long zoom lens or compact
zoom and apertures of F/2.8 to F/4. On most DSLR’s and compact cameras you can
select ‘aperture priority mode’, set this aperture and the camera will work out
all the other settings for you. Want the background in sharp focus
as well? Then choose apertures around F/8 – 11.
·
Assess whether you have balanced the amount of water, boat and sky in the
image before
pressing the shutter - try to include lots of ‘air space’ around the boat for
later post edit cropping. ‘Tight cropping’ on the boat will lead to distortion
of hull shape.
·
Check you haven’t cut off - part of the bowsprit;
hidden the helmsperson behind the boom; got something dangling over someone’s
head etc.
·
Getting all of the mast in shot is notoriously difficult so chill - aim to get just
enough in the image so that a viewer can work out what the sail rig is.
·
Wonky horizons distract a viewer, drawing their gaze away from the boat, so check it
is straight.
·
In
the main, shoot in landscape mode. However, if shooting for a
magazine cover, contact the editor beforehand to see if they would prefer
photos in portrait mode – which might better suit a magazine cover.
·
Go for a different perspective – shooting low allows your dinghy to look larger, more
imposing and more majestic – seriously – try it!
·
(Make
sure any landscape shots are in focus from foreground to background – focus on
a point about a 1/3rd of the distance to the horizon and you should
have most of the scene from foreground to background in focus.)

I’m at the
point where I can almost hear some people saying ‘if I wanted to learn
photography, I’d buy a photography magazine!’ but I’m hoping that those of
you, interested in taking better photographs of seascapes, boats and all things
dinghy cruising, are beginning to feel inspired to have a go at the DCA
competition. This next bit will hopefully, provide you with some further ideas,
tips and inspiration.
Tip one – pre-plan your photographs -
it will significantly increase your chances of obtaining high quality,
compositionally stunning images commensurate with your skill level. What is
the essential essence/aspect of my boat I want to capture? What other
situation/subject do I want conveyed in images?
Am I going for ‘mood’ or ‘action’? What is my audience and purpose for
the photo – wall print, magazine, social media account?
Tip two - seek inspiration for ‘good’ dinghy/boat photos by exploring Instagram, Facebook, Pinterest and various sailing journalism websites.
Tip three
- Photography
is about light and the best time to photograph is ‘golden hour’ - the couple of hours after sunrise
or before sunset - when winds are less, watery boat reflections more sharply
defined and nature’s colour balance warmer and softer. Golden hour lighting
illuminates the deeper recesses of a dinghy’s hull. If shooting people during
these hours, shoot them facing to the sun to get the light on their faces. If
they are backlit, make sure you expose the picture for the sky not their faces.
On a smartphone and some compact cameras, switch on HDR mode (High dynamic
range) as it will take three identical images but with different exposure
settings and then blend them together so that highlights, midtones and shadows
are all correctly exposed. As the
sun climbs towards midday, its overhead position gives harsher, colder light
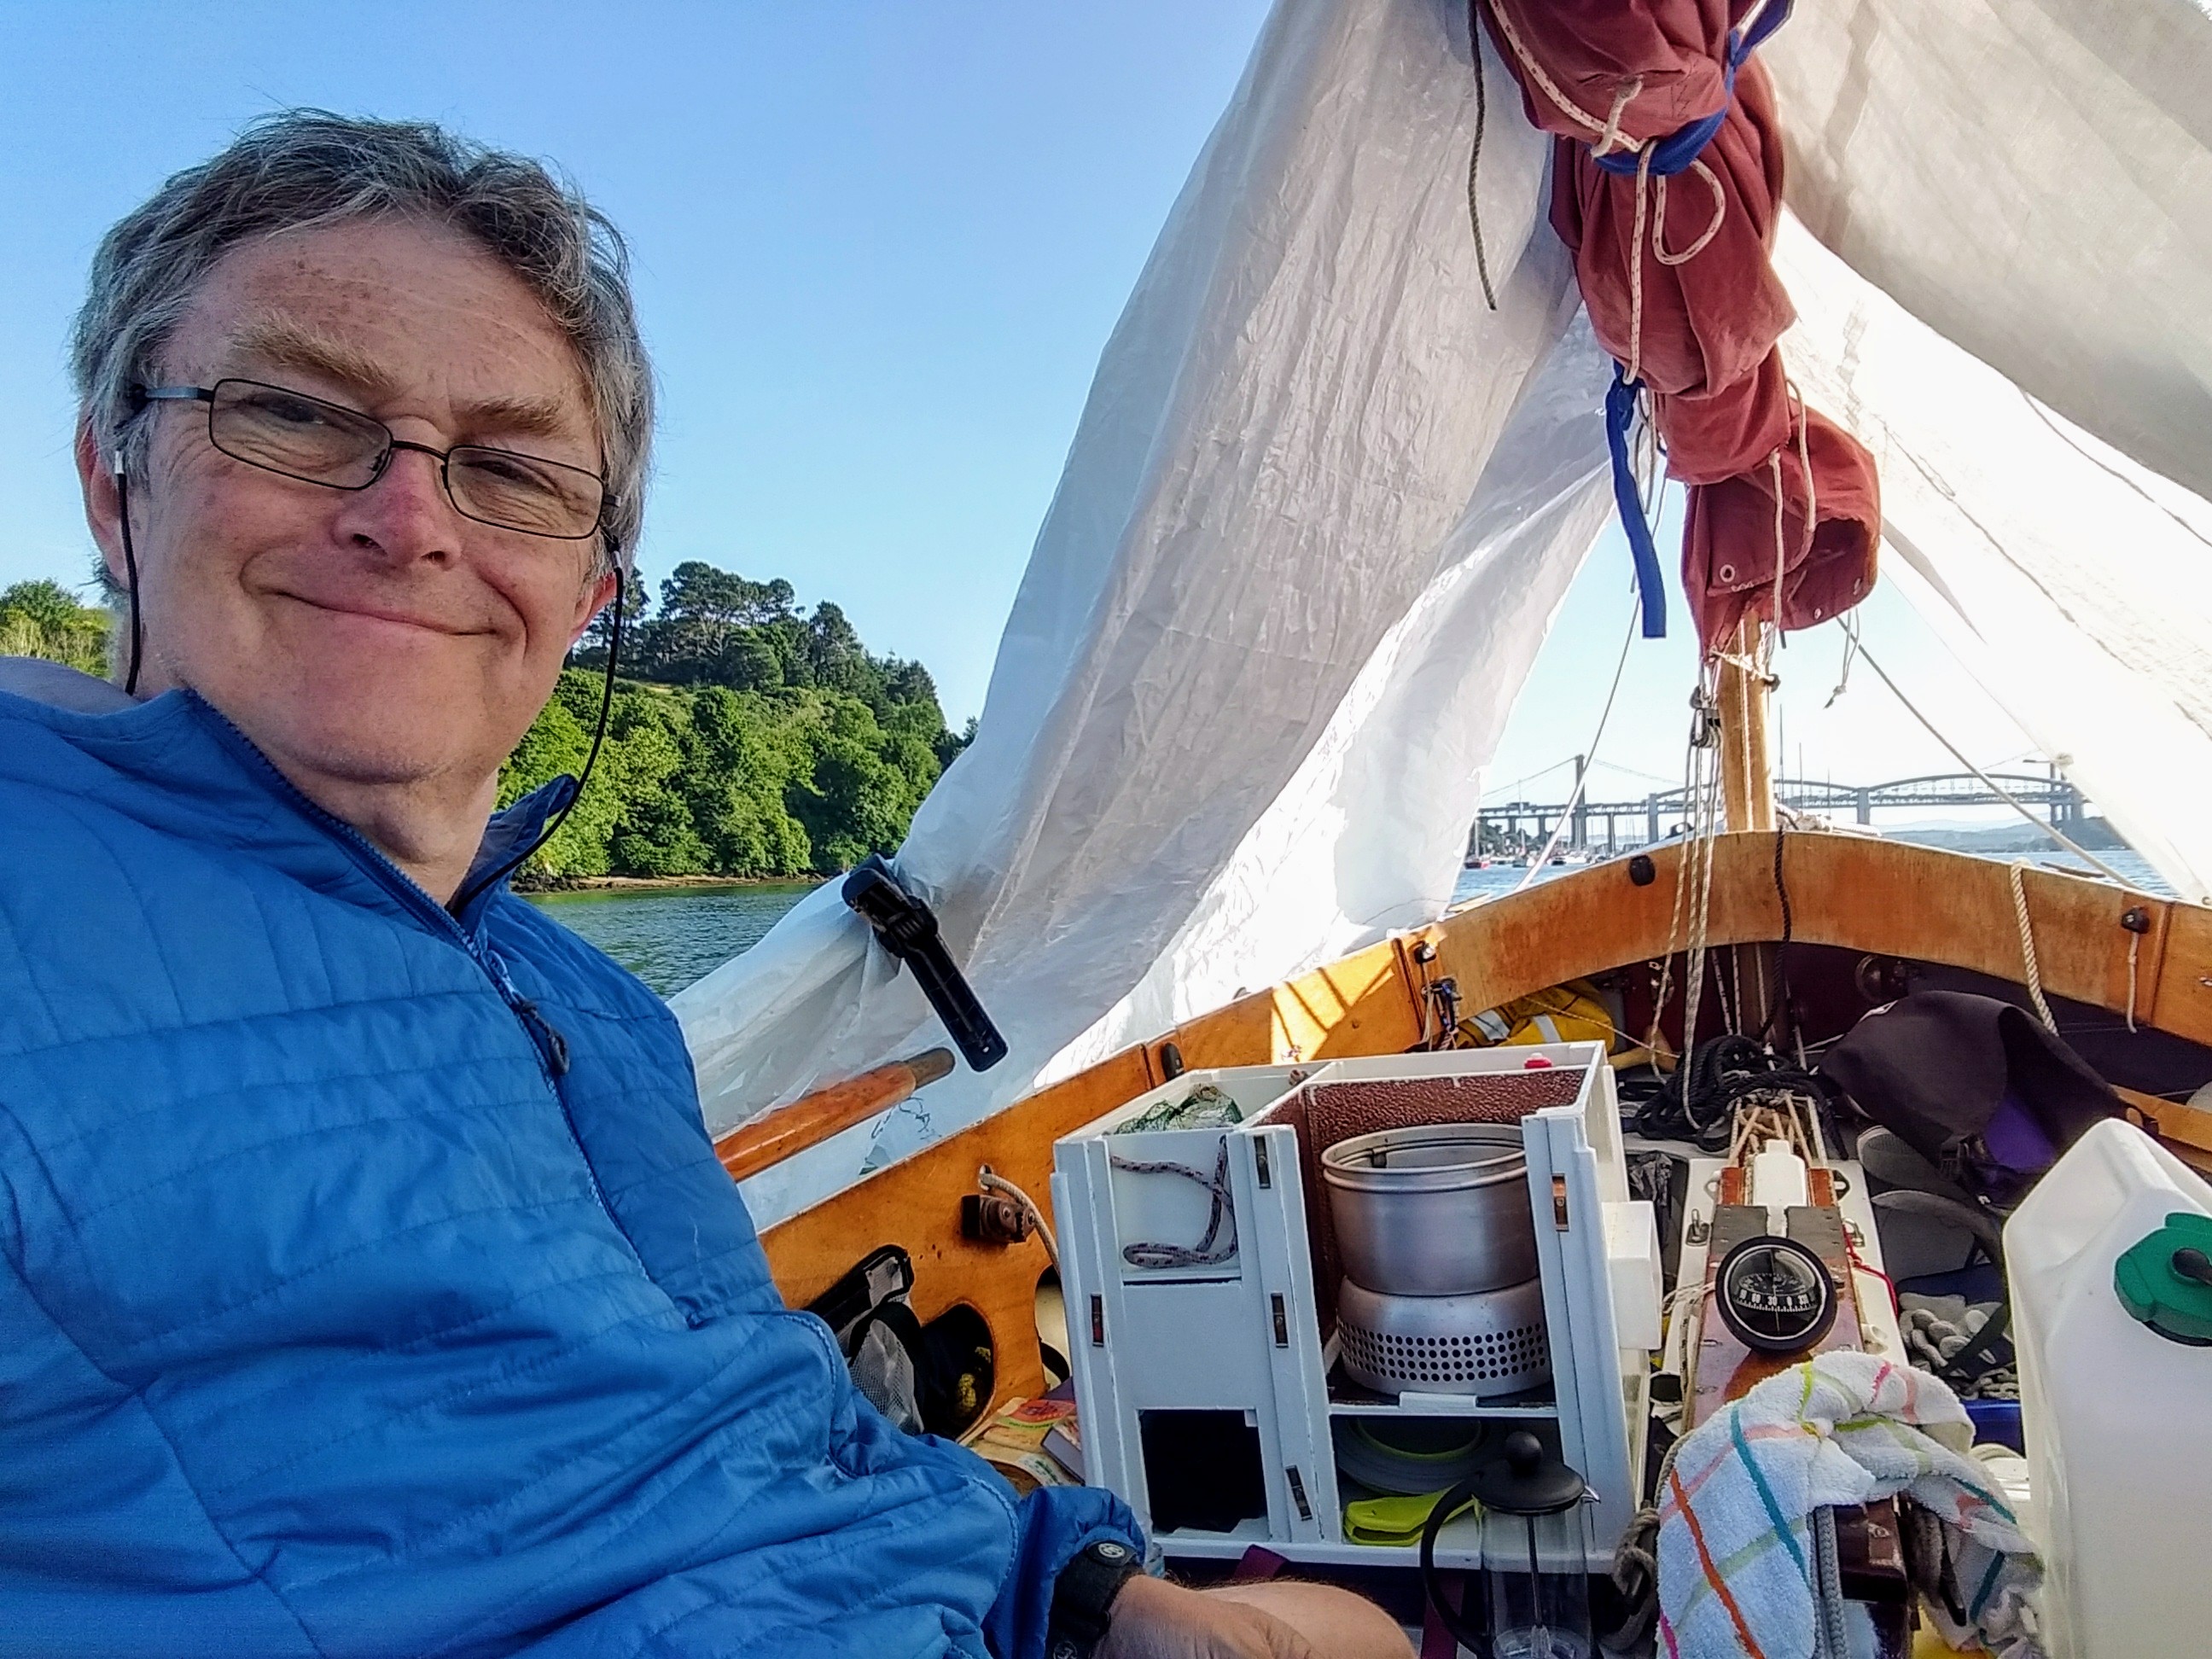
and contrasty shadows in my images that hide the finer details of Arwen’s
cockpit interior i.e. all the scratches, dings, scrapes etc. At such times, I should switch on ‘flash
infill’ to better illuminate the shadowy areas. (Embarrassment at Arwen’s
interior state prevents me from doing so by the way!) Obviously, if I’m seeking ‘spray over
deck’ shots taken from the rear of Arwen’s cockpit, then I go when tide,
wind and wave conditions are best for this; and this may be during the day and
not in ‘golden hour’. So be it!
Tip four – if you are photographing your
boat, under way, dried out on a beach or tied to a pontoon, clear away loose
lines, stow fenders and loose gear, trim lines, fill sails (says the man
whose has a permanent throat to clew crease whenever he sails). Neatness and
seamanship counts. Untidy details distract the viewer’s eye.
Tip five – it’s all about the shooting
angles! Shooting another boat on the water? Photograph it from astern – over
the transom stern quarter area as the boat rises up on a wave and you get the
whole boat length in your photo. On a collision course with an approaching bow
is dramatic! A photo taken whilst the focal point boat is on a beam reach can give
great views of decks, crew, helmsperson, sails and rigging. A boat shot from
its windward side shows more hull but less cockpit interior. Shooting from the
leeward side shows more of the boat’s lines and interior cockpit action.
Vertical portrait shots show more of the mast and rigging but try to do it when
there are interesting cloud formations in the sky as a backdrop.

Tip six – go for the sense of ‘dramatic’!
Bow splashes, spray over foredeck or the helmsperson peering from under a sail.
For splashes (and dolphins for that matter), use a shutter speed between
1/250th and 1/500th of a second to sharply ‘freeze’ the spray. ‘Sports’ or
‘burst’ mode on your camera, if you have it, will do this for you. Afterwards
quickly review the image sequence and delete those that don’t look good – it’s
a good housekeeping habit which pays off at editing time. If you are shooting a
dinghy sailing close past really dramatic coastal scenery then use a telephoto
lens or zoom with a compact camera to emphasis the scale of the boat against
that background.
Tip seven -
make a close-up ‘details story-telling’ list – and over a period
of dinghy cruising trips shoot the photos you want e.g. water droplets on a
finely varnished piece of woodwork (not that there is any of that in Arwen,
poor thing); seaweed wrapped around a moused shackle between muddy anchor and
chain; the folds of sail draped over your boom; the curve of your bow as it
meets its reflection in calm waters whilst at anchor; driftwood on the beach, beads
of condensation on that ice cold beer you saved for after you’ve rigged the
boom tent; the mooring ring or cleat you tie up to; a jib block on your side
deck; the fall of a well coiled mooring rope. I try to think ‘BIG picture-
little picture’ for a shot’s list. GoPro’s by the way are great for close ups –
be 30 cm away from the object.
Tip eight – go for uncluttered backgrounds
if you want to show your dinghy at its best.
Marinas, tall shoreline buildings, other background sailing boats - visually
confuse a viewer and distract their eye away from the main subject, your
cruising dinghy. If shooting whilst onshore, crop out clutter by using a tripod
(or resting the camera on your rucksack) and a longer telephoto lens to zoom
closer to your dinghy. The tripod/bag stability also gives better, longer
exposures in lower light conditions.
Tip nine – if you have it on your camera, switch
on image stabilisation, especially if taking photos whilst in your boat on
the sea and if you can, use your body as a shock absorber to reduce the
‘bobbing’ motion transferring to your camera.
Tip ten - taking photos of other people’s
dinghies from your anchored boat in a safe, calm area increases the chances
of getting a really good photo no end. The other skipper can helm his/her
dinghy closely around your boat and between you, you can work out the best
approach angles and distances from your anchored dinghy to ensure the shots you
get are best.

Tip
eleven – get
plenty of photographs of people enjoying dinghy cruising activities whether
it be launching, actively sailing, erecting boat tents, scratching their heads
whilst poring over charts, cooking on stoves or washing up the pots and pans
afterwards. Aim for faces rather than the backs of heads. Try to capture the
emotion – joy, puzzlement, intense concentration, laughter! No halyards, no
shrouds, no masts growing out of their heads! If sailing crews are ‘busy’ and
‘active’ in the dinghy, then use high shutter speeds of 1/200th plus
to ‘freeze the action (or use that ‘sports/burst’ mode to take a rapid sequence
of shots.) People under a boom tent at night or sat out on a beach as dusk
descends requires a higher ISO or ‘dawn/dusk/night’ setting to avoid the need
for flash and ‘red eye’ syndrome. Wide angle lens settings, 18 – 35mm lenses or
zooms, are great for group shots and remember people don’t have to be looking
at you. However, if they are doing anything active, make sure you include their
hands within the shot so that a viewer can see what is being done.
Tip
twelve – during
golden hour (sunrise and sunset) winds tend to die down giving still, flat
water, perfect for those watery reflections of hulls and scenery.
Tip
thirteen – go for
colour! White hulled dinghy, blue skies and grey seas look great but, add a
splash of colour, and the scene really comes alive. Look for those tan sails, the
yellow foulies, the bright red PFD. Any colour that jars the viewer’s eye can
be a good thing.
Tip
fourteen – own a
GoPro? Go for an early evening swim around your anchored dinghy and use the
GoPro to take images of the boat from the water level. Try for a low-level shot with the coastline
in the background during golden hour if it isn’t too chilly by then. (You can
buy a dome for your GoPro which allows you to take one of those
overwater/underwater split shots where you get to see above the waterline and
the keel and hull below the water. Impossible to do this shot without the dome
by the way! Go on, ask me how I know!)
Tip fifteen – ‘look into the light’ – backlit
silhouette shadows of the crew through the white sails and rippled clear
reflections of the boat in mirror calm seas – stunning images. And remember,
the angle your light comes from can really play a part in creating a great
photo. The more acute the angle of the sunlight hitting an object, the better
the emphasis on the object’s texture and shape.

Tip
sixteen – all
those construction projects – that pile of shavings alongside a shapely
oval profile boom; the clamps holding three sides of a materialising ‘galley
box’; the intense concentration on the face of your 8-year-old as she/he
handles a drill for the first time whilst working on the hull of your new
dinghy; the empty mug alongside a dinghy construction blueprint, a pad of
scribbled notes and the pencil? The pile of ‘frames’ cut out and ready to
erect. Those photos? They are all to do with dinghy cruising! They all tell a
great story! They all promote and celebrate dinghy cruising.
Tip
seventeen – those
dinghy drying out locations - dried out in a big sandy bay? Try to get a
little height to ‘shoot’ down onto the boat, setting it within the context of
the enormity of the beach/bay. More dramatic! In any drying out location, shoot
from the side, trying to get foreground interest such as a tidal pool with sky
reflections or ripple textured patterns on the sand in front of the boat hull. Is
there a leading line opportunity like along the anchor rode and chain to the
boat, taken of course, from a low-down perspective? Go for 1/3rd sky, 2/3rds
foreground and boat. What’s the view like out the back of your boom tent – can
you get the stove, your hand stirring the pot and a great view of your drying
out location out back all in one shot? Or how about your cockpit interior under
the boom tent with sleeping platforms sorted? Finally, I’d argue there is a
story to each of your drying out locations – a close up of the rocks, the cliff
geology (keep safe though!) – geology texture, colour patterns, strata. In
shots like this exclude the sky, focus on the rocks. Sometimes it pays to stand
back and use a zoom lens to close in on the rocks. Beach patterns and features are equally
interesting – the meandering stream, the ripple sand marks, footprints towards
your dinghy, reflections in a patch of wet sand. Rockpools provide great
foreground interest because they reflect the sky patterns; or they are fringed
by brilliantly coloured seaweeds. Sand dunes with marram grass give great
foreground interest with your dried out boat behind. Cliff tops give a good
overview of the coastline you have sailed.
I hope you
have gained some ‘food for thought’, some inspiration and a desire to enter the
DCA annual photograph/video/artwork competition this year. Remember,
irrespective of whatever your subject content/elements are …… the absolute
key to a ‘good’ photo is all about figures 2 and 3. Does your photo tell a
story/show any of the following?
- ·
emotional
impact,
- ·
some
illustration of technical skills,
- ·
some
originality/creativity,
- ·
great
storytelling,
- ·
the
promotion and celebration of any aspect of dinghy cruising,
- ·
and,
finally last but no means least, an interesting composition.
www.arwensmeanderings.blogspot.co.uk – in search bar type ‘taking good
dinghy cruising photos’
http://logofspartina.blogspot.com/


No comments:
Post a Comment