A blog about dinghy cruising a Welsford 'Navigator' around the coastal waters of SW England
Arwen's meanderings
Hi everyone and welcome to my dinghy cruising blog about my John Welsford designed 'navigator' named Arwen. Built over three years, Arwen was launched in August 2007. She is a standing lug yawl 14' 6" in length. This blog records our dinghy cruising voyages together around the coastal waters of SW England between 2009 and 2025.
Arwen has an associated YouTube channel so visit www.YouTube.com/c/plymouthwelshboy to find our most recent cruises and click subscribe.
Although 'Arwen' has now been sold to another family and is sailing in new water, this blog will remain a source of inspiration and information for those interested in dinghy cruising and sailing the local waters around Plymouth Sound. So, continue to drop us a comment or ask a question and happy sailing and fair winds to you. Steve and Arwen
I have just returned from an emergency dash across the country to see my son who was rushed into hospital a few days ago with severe food poisoning - serious enough to scare the paramedics anyway. He is now discharged but it is a very slow recovery and it will take time for him to return to normality.
So, it was a very pleasant surprise to find an email from the technical adviser of the Dinghy Cruising Association, informing me that my article about making ditty bags had won the association's 'Peter Bick Memorial Trophy' award for the best technical article in the association journal this year.
Apparently I described the process in great detail with clear photographs and diagrams and in an entertaining style.
I have to say I am surprised. The Journal is an amazing magazine with such extraordinarily well written articles on a whole host of topics to do with dinghy cruising. It is, frankly, one of the best small boat magazines out there and that is due to the amazing editor Keith Muscott, his editorial team and the association contributors. There were, in all honestly, many excellent technical articles this year, all far more lucid, analytical, thoughtful and inspirational than mine, but I'll take it. Let's face it when it comes to dinghy sailing and cruising everyone knows I am a 'work in progress'.
David also said he was impressed by my articles about vlogging as well but since they were inevitably more focused on the film-making process, he felt the ditty bag article was definitely more nautical. You can access my unrefined posts on vlogging here:
I’ve enjoyed writing for the journal over the last couple of years and
Keith as editor, has always been very patient and forgiving of my rambling efforts, whether
it be technical or cruising articles. Let's face it, I’m not really a sailor, rather an ex
mountaineer, whose knees are shot and who turned to ‘sailing’ later in life,
doing some starter lessons with Zoe and Ross down at Salcombe in a Wayfayer at
the Island Cruising Club. I think we can all agree that whilst I haven’t
killed anyone yet and to my knowledge thus far, not been responsible for any
dangers on the water, my sailing knowledge, skills and sail trimming and
setting leave much to be desired. John Welsford, is very, very patient and kind. As a life long learner and educationalist, I
believe that making mistakes and sharing them honestly, is an important life
skill, as does he I think, although I suspect he just wishes I could make fewer of them in one
of his boats 😊
I’m never sure that anything I write is
actually this worthy but I try and hopefully at some stage I will improve.
Contributors to the Dinghy Cruising Association journal are amazingly talented and their writing is fluid,
informative, entertaining and awe inspiring. Maybe I will get there one day.
I have always maintained that for me, dinghy sailing is enjoyable
but also an ‘ends to a means’ – exploration of the nooks and crannies and
communities of my stunning local waters. Just as important as the sailing, are the hobbies that
dinghy cruising allows me to pursue – my love of marine biology, expeditioning,
camera work and also my fledgling interest in astronomy and astrophotography.
(I am just trying to work out how to safely carry such gear on a dinghy to
exotic far flung dark sky corners up the Tamar and Lynher ). Hence previous articles about vlogging! If anything I do inspires others to dinghy
cruise (only doing it better than me), then brilliant.
In this light, I am at the moment working on a blog post about taking nautical and coastal themed photographs from a beginner's perspective. It will be followed up by another one about astrophotography from little creek beaches! If you search astronomy in the blog search bar, you will find some beginner tips about this as well.
Anyway, my sincere thanks to the judges this year at the Dinghy Cruising Association. As a tea-totaller (necessity not
choice), I will refrain from drinking tea out of the tankard and raise it to
all the DCA membership with a tipple of Perrier....... DCA members have been inspirational
and I have learned so much from them all. I just wish I could do them justice
by pulling it together in a better way than my normal shambolic approach to
sailing (and anything technical 😊)
If you haven't joined the DCA and might be interested in doing so, here is the link:
Down time whilst the new trailer is being modified. Its length is being reduced so that there is more of a boat overhang at the stern. Adjustable rollers are being switched about so that the bow is slightly higher off the T beam. The bunks are being replaced with two sets of pivoting rollers which move both fore and aft and laterally side to side. The aim is to make sure that Arwen slides along the trailer a metre or so before I run the trailer into the water, so that then the stern is likely to float off more easily.
It doesn't come as a surprise. Both I and the trailer manufacturer knew that some adjustments would be needed given Arwen's wide hull and slight banana shaped keel/skeg.
So, I have been strolling the coastline looking for places to sail to where I could get a reasonably sheltered overnight anchorage. I have also been brushing up on my understanding of Affinity Photo for my astrophotography processing.
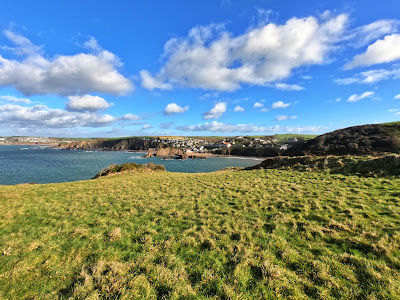
Taken from the top of the cliffs at Bolt Tail looking sort of westwards towards Inner and Outer Hope Cove. In the far distance is Thurlstone
Looking westwards back along the coast. The furthest headland you can see is Rame Head which is the western side of Plymouth Sound. Beyond that, the very low, faint smudge at sea level is Dodman Point down in Cornwall.
Inner and Outer Hope Cove - the latter is the beach in the distance protected by two concrete harbour walls - seen in the picture below
Inner Hope Cove - it has a number of lines running up the beach for boat moorings
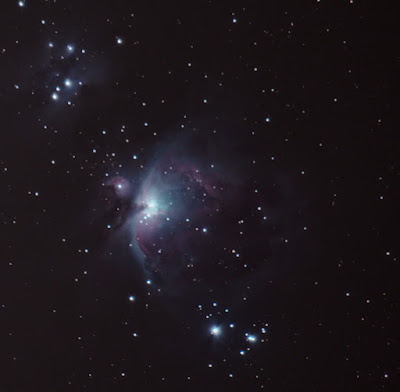
My first attempt at Orion Nebula
My second attempt........
...and finally my latest attempt. Finally I am beginning to understand how to use Affinity Photo
Two thermal tops - one long sleeve, the other short sleeved. One fleece pullover; one gilet and one fleece lined windproof jacket. Rohan walking trousers underneath Musto sallies. Thick waterproof sealskinz socks and dinghy wellies. A fleece lined thermal beanie.
And I still felt COLD!!
These 'working back up to overnighting' cruises continue despite the cold but I reckon I'm getting a real old wussie! Add that to the list that includes the dodgy prostate, the collapsing oesophagus and the waning memory........ 😂
The footpath down to the sloping driveway is slippy, the neighbouring tall unkempt garden lawn grass covered with brilliant white frost that forcibly droops the couch grass blades under its weight. My breath condenses in the cold still air. Despite the sun peeking above the eastern most horizon and casting its pink-orange tendrils of warm light across the local hill, the birds stay hidden, reluctant to emerge and start their dawn chorus. To be honest, its bitterly cold! The start of one of those 'crisp' sunny but cold, high pressure January days.
The car windscreen heaters roar into action and slowly, circles of clear screen appear. Quicker than all that scraping! Meanwhile, the boat tarpaulin, stiffened by the frost, 'crackles' as I pull it off. Sleeves dampened by the drips flowing off it as the frost begins to melt leave me chilled. The new trailer is narrower and the tarp rope tie offs go further under the boat hull meaning I have to get down on my knees to undo the hitches. The cold drip that finds it way past my collar and down the back of my neck is shockingly unexpected! And now I've got wet knees too.
Good job I packed the boat yesterday. Poor Arwen has been under the tarp for five months now and part of the winter storage routine is to empty all her contents into the garage. She has some grubby puddles in the bilges; leaves blown up under the tarp have gathered on her cockpit sole. There are small faint patches of black mould on thwarts and coaming, easily wiped off with a cloth. Forlorn and neglected, poor thing. But now, her rudder, boomkin and tiller lie along her side thwart. Fuel for the outboard is safely strapped to her port hull side. Safety equipment is in the starboard centre thwart locker. Warps are coiled and hung neatly up front. The anchor is in its floor box, with nicely flaked warp, all secured. The car boot has boxes full of clothing and the spare trailer tyre.
Last September Arwen got a new trailer. The previous one, fourteen years old, gave up the ghost last trip out. The axle stubs almost collapsed and the hub bearings exploded on the way home from the marina. The last two miles home were at 4mph, sounding like a rumbling tank that has lost one of its tracks. There were no warning clues. The wheels didn't wobble and on the way out there were no 'grating' sounds but there we go. No excuses! Serves me right. During all the chaos of 2021 I forgot to check and re-grease the bearings. Salt water eh? The silent deadly assassin for wheel hub bearings!
But not the only assassin to attack Arwen over the winter though.
Sssssh, don't bandy this about, but I found some wet rot! I know, its surprising, shameful, shocking! I hang my head in humiliation, how could I let this happen to poor Arwen? A hairline crack on the coaming edge where the tarp rested. I missed it and so water slowly seeped down that crack all last year. When I accidently knocked the affected area in October, a piece broke off.
I was devastated, genuinely horrified. Evidence of my neglect of my boat. A failure of seamanship and routine maintenance checks. I remember hurriedly glancing around to ensure that there had been no witnesses to my shame. I had to surreptitiously get expert advice on how to do the repair and, fortunately for me, Howard Rice and John Welsford rode to the rescue. Using a multitool and their instructions, I managed to remove the affected area without having to cut through the whole coaming thickness. A 4mm thick piece of bendy marine ply was cut to shape and epoxied back in. Two hours work. The following day after clamp removal, sanding and painting the undercoat, you couldn't see where the repair had been done.
Now, as I try to find where the repair is, I realise I 'm quite proud of this bit of woodworking. Lets face it, being candidly honest now, I'm not exactly renowned for my wood working or general DIY skills. There is not a single shelf or picture which hangs straight or level in our house! And, if you ever visit us, avoid sitting in the garden chairs I built. I can't really guarantee your well-being in those.
With wheel clamp and concrete block chocks removed (she resides on a steeply sloping driveway), I ease Arwen down the slope and onto the road. Lighting board support rods are inserted into their slots, the board added and lighting checked. Phew, all is working. A quick walk around to check ratchet straps and rope ties holding mast, yard and booms in place. All seems safe and secure. Outboard in the car (remembered to close the air vent this time...couldn't get the petrol smell out of the car for weeks after that last disaster); and a final mental run through of checklists.
Have I got everything for the day sail? Of course I have. I packed it all carefully yesterday. This is the first sail I have done since August 2021. I am soooo excited! Light winds F2/3, easterlies. Low tide at 0830. High tide at 1430, 4.5m high tide. Sunshine all day and no rain!
I confess I should have a passage plan but I don't! I know, what a rebel! Seriously! With fairness I have left some details with the boss.
"All day within Plymouth Sound breakwater; possibly into Cawsand Bay and up the river Plym as far as Laira Bridge. Possible foray into the Tamar but no further than the Torpoint Ferry. Will ping you Garmin Inreach 'OK' message every hour as normal. Off the water at 1400 and will txt to confirm this"
Seriously, no plans. Just happy to sail up and down the sound between the breakwater and the Hoe. Easterlies will make a beach stop in Cawsand uncomfortable, so perhaps anchor stop in the lee of Jennycliffe? Could sneak a cafe coffee stop over at the Barbican or Mountbatten? Must remind myself how to heave to or reef sails! Could do some sailing up to a mooring buoy. Always need practice doing that since I almost always make a complete mess of it every time I do it!
Twenty minutes later and I'm hidden away in Queen Ann's Battery marina; down a little alley between the tall yachts on their winter blocks and pit props. I'm out of the way. I'm not sure how long it will take to re-rig Arwen. I start by ensuring the topping lift come jack stays are reattached to the mast head blocks and down around the base of the sprit boom. It takes me a few minutes to work out what goes where but eventually the mast is raised and slotted into its position and the shrouds untangled and lashed to the chain stays. Only then do I discover that the jack stays have managed to somehow cross over each other and so the sail wont be raising fully. Shrouds are unlashed, mast lowered and blocks and lazy jacks sorted out. With the mast now raised and the lazy jacks as they should be, the jib is unfolded. The furler is still attached and the red furling line hangs down in a hank. I stare at the bowsprit end. Now I know I put a new shackle on the jib furler attachment point yesterday. But it isn't there now. I am mystified! How does a shackle disappear in less that 24 hours?
Rummaging around in the spares kit does not give me a shackle of sufficient width or pin diameter to fit the furler base. Curses and cusses! Under my breath of course! I madly scramble back into the boat and start checking blocks and their shackles, eventually removing and replacing the one from a mainsheet block. This shackle will fit. Mental note to self, get a suitable replacement, or two, next time I'm at the chandlers.
Problem solved but its taken ten minutes to sort out. A further ten minutes goes getting the jib furler working properly as well. What a devilish dark art is sorting out how much line needs to go onto the furler drum in order to make the jib furl and unfurl correctly!
It normally takes 30 minutes to rig and launch Arwen. Frankly, that isn't going to happen this morning! I've forgotten everything. How to bring the sprit boom line control line, main sail halyard and topping lift back to the rear cockpit? Several fumbles and rethreading of lines. How to unsort and arrange the luff tension downhaul tackle and sheet? A few minutes wasted there resorting lines, blocks and cleats. Which halyard goes over which? I CAN'T REMEMBER!
To make matters worse, I've forgotten to put the halyard bag in the rear cockpit. Now its just a mess of 'tangled string' everywhere! It just won't do. Not seaman like at all. Shambolic! I mentally let a few welsh epithets fly through my brain. The banging on the boat next to me ceases and a grinning head raises itself above the coaming. Damn, I must have cursed out loud! Whoops! Now I'm feeling slightly flustered and somewhat embarrassed!
On goes the outboard, the rudder and the boomkin. The tiller is inserted and my take on the tiller tamer sorted out. Time for the mizzen mast.
Bugger!
It's still hanging in the rafters of the garage with the mizzen sail attached. "Oh God, when you handed out brains to everyone, why did you miss me out?"
The boomkin is retrieved and put back in the car! I hope no one is looking!
By the time I have wiped Arwen out, sorted the lockers, retrieved the camera gear, food and clothing for the day, another 30 minutes has gone by. Normal rig and launch time 30-35 minutes. This morning? A very embarrassing 90 minutes! 'Gosh doesn't time fly when you are having fun!' Huh!
Now, finally ready to reverse the boat down to the slipway for launching, another problem crops up. Unnoticed by me but clearly noticed by everyone else within the vicinity, a large low loader with a huge fishing boat on it has arrived. So absorbed in what I was doing, I missed it reversing back into the yard.
I know! HOW? How do you miss a 40' long low loader less than 10 metres away from you?
It has blocked me in. The marina's mobile slings crane is being manoeuvred into position for lifting the boat off the low loader and into its new position on blocks in the yard. They still have some of the refit to complete apparently. It will be another 25 minutes before they can free up a gap for me to get to the slipway!
"This is not the plan! I should have been in the water an hour ago and by the time I get in the water, climate change will have caused another 1.5m rise in sea level worldwide!!!!"
A windswept, sea hardened inshore boat fisherman stares at me, barely able to contain his good natured mirth. "Aaah bad luck, poor timing mate....you know what they say though....tide and time.......".
His voice fades, the unfinished sentence whisked away on the breeze. It must have been the maniacal look on my face!
Eventually, I'm able to launch Arwen off her new trailer for the first time and I get some new surprises. Despite her being fitted onto the trailer by the trailer manufacturing team, Arwen just doesn't want to move. Its an incoming tide. The trailer wheels are practically submerged. Water is dangerously close to the car exhaust pipe. I rock her. I bounce her. I push like crazy. Nothing! Nada! Running into a brick wall and all that!
I pull the trailer out of the water and crouch down for an inspection. Nothing untoward. Centreboard not fallen down. Everything as it should be.
Options? A - I could tie a rope to the trailer and then to the hitch and uncouple the trailer and allow it to roll down in a controlled fashion so that it is more submerged. She should float off then. Seems like a pain though! B - What if I could push her back a metre on the trailer before launching her? Would that work? Her stern would then get into the water quicker? Would that help float her off?
I opt for plan B and to my surprise it works. Now I was warned that switching from side rollers to bunks would make launching slightly harder and the trailer would need to be further in, but I hadn't given thought to the proximity of the exhaust to the water level!
"I wonder if there is a way to reduce the friction of the hull on those small rubber bunk supports? Grease the rollers, furniture polish on the keel roller rubbers?
Is it possible that too much weight is still on the bunks rather than the keel rollers? Are the bunks too far back so that much of her girth has to cross them during a launch? Could I move them forward a tad more?
Would putting old carpet on them work better?:
Ho hum! More questions than answers but for now I am relieved she is in the water. But its taken another 20 minutes to sort!
As I turn Arwen around to face up the marina exit canal and draw her towards the pontoon, I breathe in deeply and try to chill. "Its supposed to be fun idiot, chillax!" ('chillax', oh how many times have I had teenagers telling me to 'chillax sir' when I've remonstrated with them over their tardiness in meeting assignment deadlines!)
I run the trailer up to its storage place at the top of the slip and drive the car out of the marina yard and around into the marina car park. calling in at the office to pay the launch fee reunites me with the office team. Haven't seen them for several months so we quickly catch up on family gossip and Christmas experiences.
Back at the slipway, the water is remarkably clear. Little fish fry dart away from my shadow seeking the cover of the pontoon. The outboard engine coughs into life after its long hibernation in the garage on the third pull and settles down to its reassuring rumble. I tidy up 'the stringy birds nest' in the cockpit, set up the GoPro cameras and check my life jacket, handheld VHF and smartphone. I ping an update text to the boss. "Ready to depart. Don't ask!"
Sailing directly out of the marina canal is always tricky. I tried it once or twice. Not for the faint hearted or inexperienced sailor to be honest. Only about 5 or so metres wide it opens directly into Sutton Pool just south of the lock gates in to Sutton harbour. Opposite is the terminal pontoon for the pilot boats, tourist boats and water taxis. Yachts and fishing boats often come through the lock gates. It is a busy area and the main marina entrance is only a few metres away to the south as well. Unless skippered well, boats trying to sail out of there often try the patience of other skippers going about their daily jobs. Hence I use the outboard for this short section. I need to learn how to scull over the stern....I know!
Today, I motor the 100m or so to a vacant buoy in the Cattedown, turning into the tide and coming to a complete stop alongside a yellow can. Hand walking the can down the starboard side, I loop the painter through and bring it inboard to a stem post. We are secure. Easy peasy!
Time to breathe again. I sort out camera positions once more, get a feel for wind and tide and move a few things around to improve trim and balance.
And there is time to consider sailing off the mooring. There are no other boats moored; all out of the water, I have open expanses to try a skill I don't do often enough. I run options through my head. If I had my mizzen, I'd have done what I've done before - whether its the right way I have no idea - but its worked before; "slip the painter, raise the mizzen, downhaul the rudder, head downwind to clear the buoy and unfurl the jib". With easterlies I could make the turn south at the end of the Mountbatten breakwater and head off in to the sound for more open water before raising the mainsail.
Rats! No mizzen! OK - option B - "Do it under jib alone. Is there sufficient breeze? Can I make that turn?"
I mentally chastise myself. So often I just head away on a trip and don't spend enough time on the basics; too quick to fire up the motor. Mental note to self "2022 the year I regularly re-acquaint myself with the basics - reefing, sailing on and off a mooring; sailing off anchor; sailing onto and off a pontoon"
Or I could......"No perish the thought, daft idea"
I go with option C the daft idea. Nothing ventured nothing gained or learned. Facing into the tide but with the lightest of breezes coming from behind - there's the clue to my madcap idea - the lightest of winds - I pull up the topping lift a little to raise the sprit boom with its furled main sail and loosen the mainsheet so that there is plenty of slack should the sail suddenly blow out against one of the shrouds. Sail ties are removed and placed in their little cockpit coaming canvas bag (last year's lockdown project). Rudder up, centreboard up - "check". Forgot the painter. Slip the painter!
Arwen eases backwards very slowly. At the mast foot I loosen the downhaul considerably; enough slack so that the foot of the sail will just flap. I haul away, the sail rises, its lower part somewhat scandalised. It's upper leech falls away, flapping idly.
Nothing happens. No wild swinging around the mooring. No sudden sailing off. I insert the main halyard into its cam cleat in the rear cockpit. The rudder is hauled down, the centreboard dropped a little. The topping lift is released and the boom drops slightly. Tension on the downhaul to tighten the luff and the main sail suddenly fills and blows out slowly to starboard.
We are moving. Moving under control. The yellow can drops astern. I have no idea whether I have done the right thing here but it works. I'm damn sure if there had been any more breeze then things would have gone differently!
The yellow harbour taxi crossing my path comes astern of me and I get a friendly wave from its skipper. A motorboat out of Sutton Marina passes on my starboard side, courteously giving me plenty of space. He slows to reduce his wake, a kind gesture. There wasn't much and Arwen would have bounced over it with no problem, but his thoughtfulness is appreciated non the less.
And then the breeze dies completely. Nothing. I'm slowly going backwards with the incoming tide. And I'm drifting landwards.
I don't get far with rowing. Inevitably I crank up the old engine. Ho hum!
There are no fishermen at the end of the breakwater today so I cut a little closer to the rip rap at its end as I slowly motor outwards into Jennycliffe Bay where sail raising goes slightly better than the first time.
There is barely any breeze. I'm on a broad reach, of sorts. My soundscape is one of idly flapping sails, halyards listlessly rattling their blocks, water gurgling down the hull sides. And a rumbling noise. "What is that noise?" A deep, low, barely audible, gurgling rhythmic rumble.
Of course, the outboard is still down and its the prop being turned over by our gentle forward progress. Its a sound I haven't heard for so long!
Today, I haven't quite got the main sail right. It hasn't fallen correctly to the port side of the sprit boom and so there is the slightest of twists in a small lower section where the downhaul tackle joins the luff base. On the plus side, the dreaded diagonal crease from top forward yard to clew is gone. Wow! It is just not there. I have no idea what I've done but I am thrilled to see its missing.
Perhaps the rest of today's sailing might just go a little better than the rigging bit did. The wide open expanses of Plymouth Sound lie before me, empty of any other ailing vessels. The sun is shining, the sea is calm, the breezes light. The main sail flutters slowly to life, the orange shroud tell-tales lift and flicker and the jib sheets rattle through their side deck blocks as the jib fills to starboard.
Nothing to do with boats this post; all about astrophotography. And some very welcome end of year ingenuity. Wished I'd had this through the year but better late than never I guess.
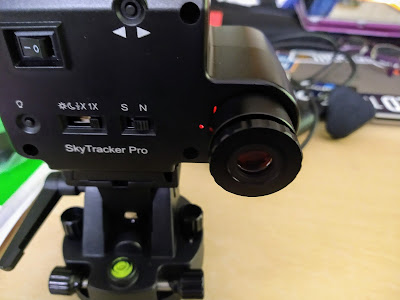
I use an Ioptron Skywatcher Pro star tracker. It is the smallest of the star trackers and a clever little gizmo. It allows me to take far longer exposure photos at lower ISO of the night skies above me. It is also great for astrophotography landscape pictures under the Milky Way.
My Ioptron Skytracker Pro with the polarscope in its slot on the right hand side
Two niggles I have with it are
its low payload - 2lbs 8ozs without additional counterweights - so I can just about use my DSLR with its 250mm lens on before I get star trailing
the polarscope arrangement - which has you on bended knees with a cricked back.
There isn't an astrophotographer alive who uses a star tracker who doesn't understand this last issue. here at a latitude of 50N - the tilt of the tracker is such that when the polarscope is inserted, you are on your knees with your back arched to look up through it. If you can do that! When I'm on my knees below it, my eye is around 14" away from the viewfinder - rendering it useless!
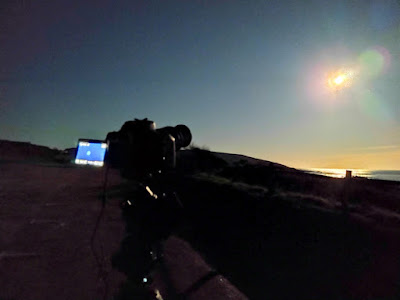
Down at the beach using the skytracker for the first time
It is actually midnight with a full moon - a useless time to try and use a star tracker as all the milky way is washed out from moonshine. You live and learn! 😂
(I should at this point explain that a polarscope is essential to getting good alignment with the stars so that the camera tracks their movement above. This involves aligning the tracker with the north star Polaris. The bigger the lens you use, the more accurate you have to be in your alignment processes - otherwise you will have horrible trailing stars and photos that cannot be stacked together in any available software.)
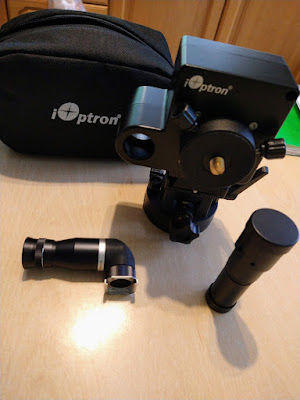
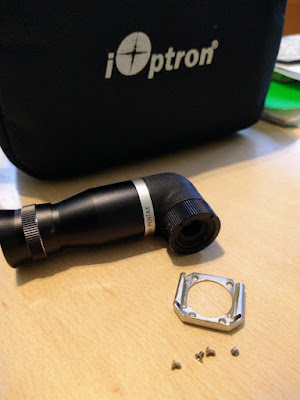
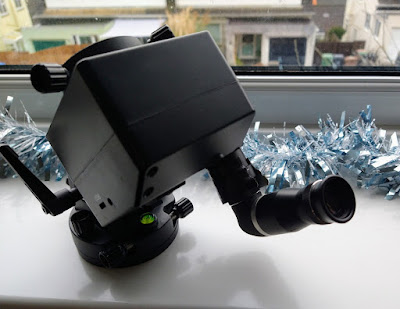
Take one polarscope, one sky tracker and one right angle DSLR viewfinder.....
Anyway, cut a long story short. I was mulling over this conundrum a few days ago when sudden inspiration hit me - a solution to the issue. Now, to be fair, I probably saw a similar idea sometime during the year on a forum or in a magazine and ignored it because at the time it didn't seem relevant to me. However, my brain must have filed the germ of an idea away somewhere and this is what surfaced today.
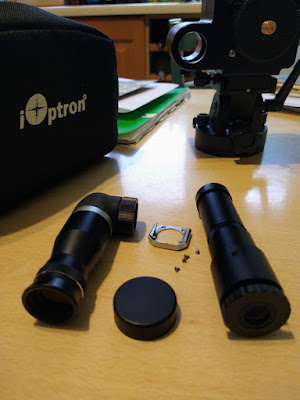
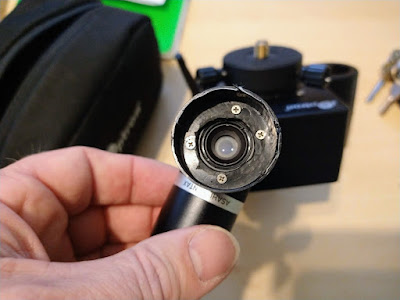
I managed to purchase off ebay a very old but functional right angle DSLR viewfinder for £20. Now a purpose designed right angle viewer for a polarscope retails at £69 plus!
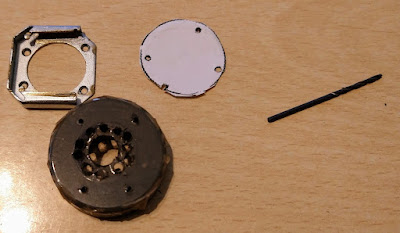
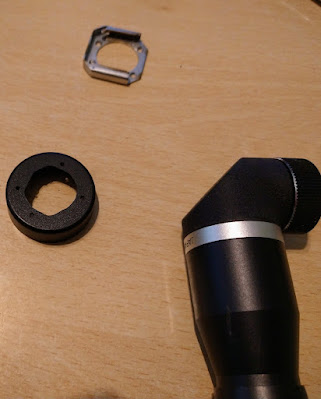
I removed the metal silver viewfinder frame off my ebay purchase by undoing the four tiny screws and then took the protective cover lid off the polarscope. Using the silver viewfinder slot as a template I then marked out drill holes and also a central large hole to be cut out.
Ten minutes judicious use of my multi-tool with drill and then sander bits and hey presto - the protective lid had been cut out. It was then just a matter of screwing the lid back onto the DSLR viewfinder and then doing a few trial fits.
It proved to be a little loose but a thin strip of duct tape on half of the lid lip - turned it to a fairly snug push-on fit.
Does it work? OF COURSE IT DOES! 😁
I have genuinely surprised myself - no more wet knees, cricked neck or wrecked back muscles.
Now if only the clouds would clear for a few hours around midnight!! 😭
And a few shots I have managed to take in the first six months of learning a new hobby.......enjoy
A very first effort at M31 Andromeda galaxy
Second effort at M45 Pleaides
First effort at the milky way - this is cropped in on the image - the galactic core
There is something relaxing, calming, even settling, about varnishing a pair of oars. There is that smell which I find hard to describe but which always brings a little skip to the beat of my heart.
I know there are many who despise varnish. Perhaps not despising the varnish finish itself, but more the hours of preparation that have to go into getting the base for a really good lustrous finish; followed by the many coats needed to enhance the natural colour of the wood to achieve that lovely rich sheen.
There are some I know, who would advocate that the best form of varnish for a boat is a coat of white paint! They will remain nameless, although I am sure, they are referring to hull work only; after all, surely spars and oars should be varnished so that the natural splendour of the wood is on display for all to enjoy? I mean is there nothing more beautiful that a well presented set of booms and spars, painstakingly varnished with love and attention to detail and with their ends painted stunning white gloss?
Ah well perhaps its just me then. And we all know how daft I am 😊
I have sanded the oar blades with various grit papers and given them two coats of thinned varnish. Now I embark on light sanding between coats and perhaps another 3 coats of varnish. I am not too worried about achieving a magnificent glossy lustre of aching beauty. After all, these oars are functional, there to be used. First trip out they will have gained some battle scars once more!
For now, I revel in the rhythmic, gentle back and forth movements of a lightly loaded paint brush. It is hypnotic, spellbinding and a period of calm after the busyness of the Christmas festivities.
And so to a belated Merry Christmas to you all. I sincerely hope your festivities went well and that you and your families are all safe and well. Take care and happy new year to you all, despite the difficult circumstances of a pandemic which seems to have no end in sight yet.
A progress update - after three undercoats - here is the coaming repair - just three top coats of International Toplac gloss to go
Can barely see where I had to cut out huge chunks of wet rot and insert a new piece of ply!!
(see previous posts for that saga)
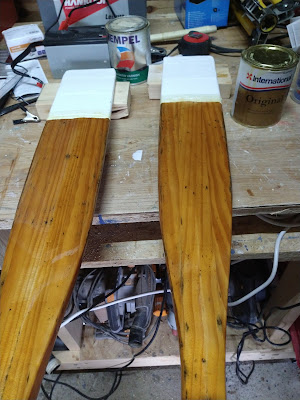
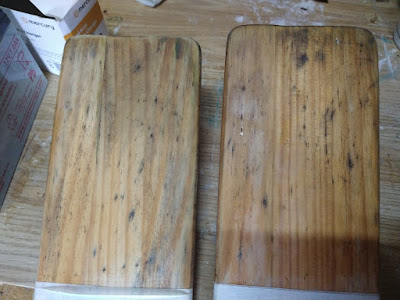
The split oars are in the same place - three undercoats and now awaiting three top coats and then a sanding of the varnished looms before three coats of new varnish
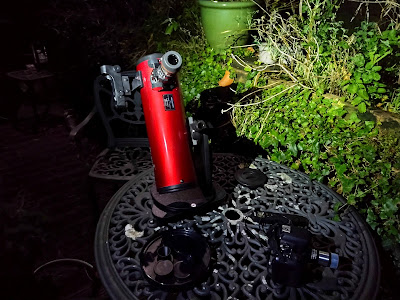
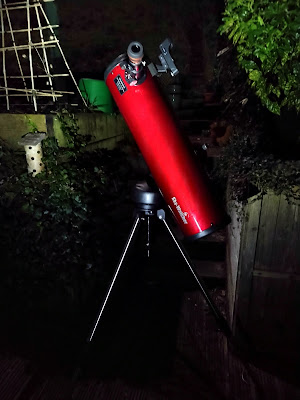
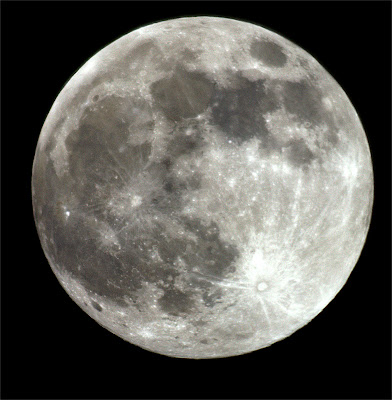
In the meantime, whilst waiting for paint to dry (not really but hey.....I need a weak excuse for posting the stuff below), I have been trying to get to grips with more astrophotography. On the one hand I am getting better at taking images with my small star tracker and a DSLR. Sadly, my two telescopes were not designed for doing astrophotography and whilst I really enjoy doing the observing bit, it is frustrating not being able to use them for any imaging other than a few grainy shots of the moon.
Above my table top beginner's dobsonian - Skywatcher Heritage 100
and below
my 150mm/750mm GOTO newtonian telescope - a skywatcher discovery 150i WIFI
The real steep learning curve though is in the learning how to post process the images I collect. I am trying to get to grips with specific stacking software such as Deepskystacker and then with general photography processing software - affinity photo. I am getting there and have learned heaps in the last few days but it is hard work!
Taken on the Heritage 100
I managed to botch together my basic DSLR, the end of a x2 Barlow lens, a small moon filter and a universal 1.25" T tube
Taken on my 150mm scope using my DSLR and a x2Barlow lens
My first effort at processing the Rosetta nebula taken on someone else's telescope.
The pink colours are wrong - it should be more reddish due to the hydrogen gas clouds.
This is where I still have lots to learn about workflow and skills using affinity photo
Shouldn't be too hard on myself - I managed to get this on my small star tracker.
It is processed in affinity photo but since I did this one a few months ago - I have learned heaps - so I might give the original data another going over. This is M45 Pleiades by the way
I noticed a split in one oar so I needed to do a repair. They are rather battered oars and have seen better days but I tend to use them as temporary ones on Arwen until such time as I build a proper portable rowing seat and alter the rowlock blocks to accommodate my longer oars that I built a couple of years ago. You can find details about those oars here https://arwensmeanderings.blogspot.com/2019/04/building-oars-for-john-welsford.html
This is the starting post - there are several about making my new oars and testing them out.
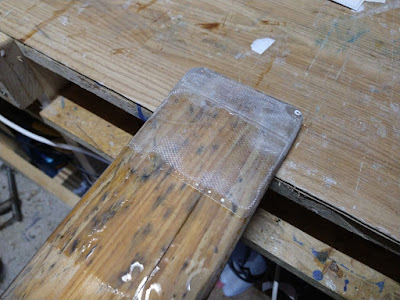
Anyway, back to the temporary ones! The split. A rushed repair, because I am hoping to sail next week. I sanded the broken areas to remove any old varnish and then on the split oar. I then cut some fibreglass tape I had over from another project long ago into strips - one I used to go across and around the blade tips - cutting darts into the cloth at each end so that it would correctly.
After doing the cloth and mixing up epoxy, I knocked in the tip of a thin flat screwdriver blade to prise the crack apart further. Trickling epoxy into the crack was difficult and I used a trick recommended to me by someone on one of the dinghy cruising Facebook forums; namely to use a shop vac - hoover in the UK - on the underneath of the crack. The suction pulled the epoxy further into the crack. It actually worked!
The cloth tips were put on and wetted out and folded over correctly . I added a little more epoxy on each side to ensure the cloth wouldn't dry out. It is a balancing act - too much and the cloth 'floats' off; too little and it dries out and there are areas where no epoxy takes.
Its rough and there are ridges even after sanding
Another strip was then butted up to the first on each side of the blade as well. The issue here would be the join line - because of the nature of the cloth - the butt between them would be slightly raised which would require sanding later ad possibly some fairing in.
The end result?
The cloth and epoxy set correctly. No dry parts; no floating away from position. I trimmed off all he rough edges using my multitool saw blade and then sanded each blade. As I suspected, there was a ridge between the two sets of cloth and sanding just wouldn't remove it.
It was now that I discovered that I have no fairing compound. I thought I did, but alas none to be found on the epoxy shelves. After a few minutes reflection, I have decided to leave it as it is. I have sanded it all as smooth as possible but getting fairing compound now with only a few days to Christmas will be difficult. With Omicron spreading rapidly in Plymouth and our area now one of the highest affected areas in the UK, we are trying to avoid any unnecessary contact with others so that we dont have to self isolate over the Christmas period, jeopardising plans with family.
They are temporary oars and a rough-ish job will do. The first undercoat has gone on. I will paint the tips five coats of paint and then sand and re-varnish the oar looms and top parts of the blades.
Arwen’s Meanderings is my long‑running blog about dinghy cruising around the rivers and coastal waters of the South West. For many years I’ve explored these shores in my home‑built Welsford designed ‘navigator’ dinghy - sharing trip reports, coastal passages and the realities of camping aboard a small open boat.
I also focus on maintaining, modifying, and adapting a small cruising dinghy for comfort and safety — from rigging tweaks and storage solutions to onboard camping systems, reboarding aids and practical seamanship.
Alongside the YouTube channel ‘Arwens Meanderings – Plymouthwelshboy’ this blog is a resource for anyone interested in small‑boat cruising, DIY boat improvements, and quiet exploration under sail.
Maurice Griffiths and His ‘Eventide’ Yacht
-
*'Ishani'*
Many yachtsmen will have affectionate memories of sailing and owning boats
that were designed by Maurice Griffiths, and perhaps thousands...
Weston Open Day
-
Slightly late posting of the bank holiday open day at Weston SC, although
the heavy rain on Saturday wasn't repeated winds were forecast at 15 -24
knots ...
The America's Cup in Barcelona
-
I haven't posted for a long time, but it's blog anniversary day and I've
recently been in Barcelona where managed to see the America's Cup, so
thought...
Wandering on wheels
-
Some years ago, after a short illness, I wrote a song called ‘I haven’t
finished yet’. It’s about dying – or rather, not-dying, a bucket-list song,
a plea ...
FOR SALE
-
Sailing Just For Fun: Rare opportunity to own wooden gaff cutter Shoal
Waters. Owner retiring. New sails. Yard trailer. Spare original sails.
Ghoster sail....
Moving this blog to Wordpress, Nov 2014
-
I am going to continue this blog on a new *Wordpress *site. I have got
tired of the restrictions and changes that occur to the image library here
on Blogsp...
Capsize
-
I capsized last week for the first time. Ever.
Those who have been here for a while will recognize the eighteen foot long
*Saga*, a design based on the ...
Removing Butyl Tape: Suggestions?
-
*Gardens'* CB case leaks a fair bit when sailing to windward. The case has
three parts: the main trunk; a 'box' (housing the CB uphaul rigging); and a
'c...
CNC files for Welsford Tread Lightly - FREE
-
*NOTE: These CNC files have been updated to add planks and correct
errors. If you have previously downloaded these, please re-download
Revision "A".*
...
WEBSITE INTENTIONS
-
Now I have learned how to access and add to the site, I’ll be posting here
on a regular basis, the intention is to put build blogs, some tips and
hints, ...
New Stretcher - Old Stretcher
-
In rowing there are different definitions of the word 'stretcher,' but this
one seems to work for PicoMicroYacht.
*Stretcher: Also known as the foot stre...
Slack Water Alice.
-
Its been a long time coming.
Designed over ten years ago as a simple two sheet canoe but never built due
to "life" and a lack of confidence, she's final...
Helming a Boat
-
Steering the boat is called helming and the person doing this is called the
‘Helm’ or ‘Helmsman’. You steer by easing the tiller away or pulling it
towar...
Themed Issues —by Joshua Colvin
-
This might come as a surprise to some of you, but the selection of articles
in each of our issues is more-or-less coincidental. Any apparent “theme” is
mos...
day nine - hellos and goodbyes
-
UP at 5:30, clear skies and a light west wind. The day begins with a new
set of clothes. How nice!
Tucking away gear I see a man approaching on a padd...